Corner-to-Corner/C2C STRAWBERRY STITCH

A close up photo of two overlapping c2c strawberry stitch squares

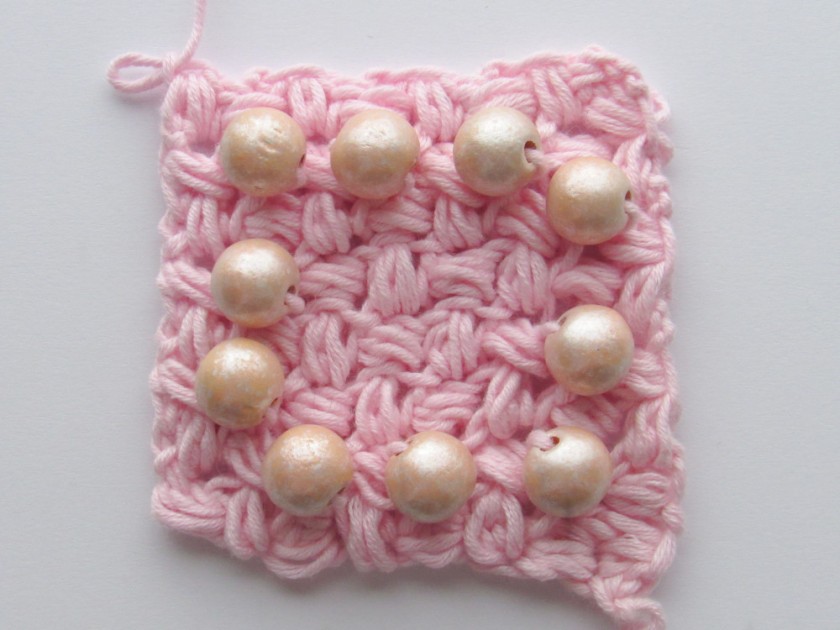
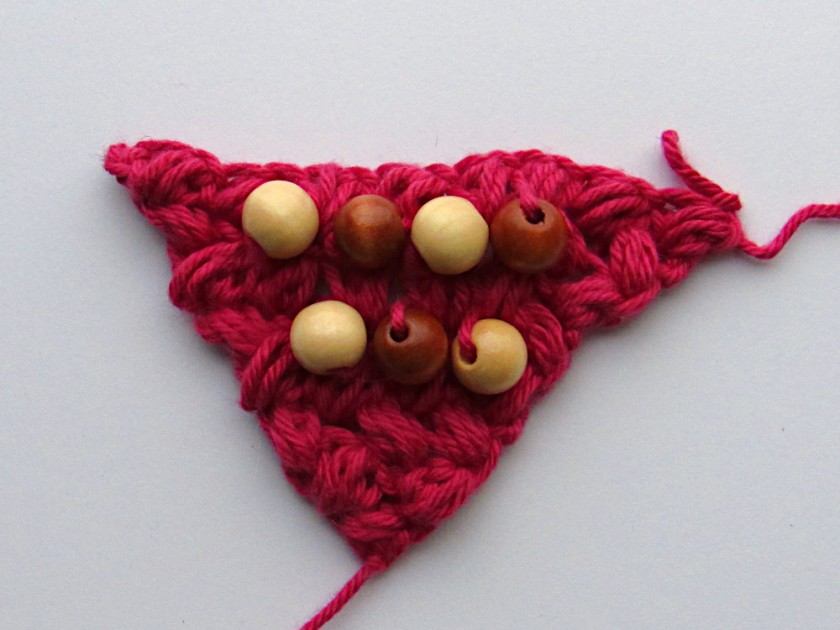
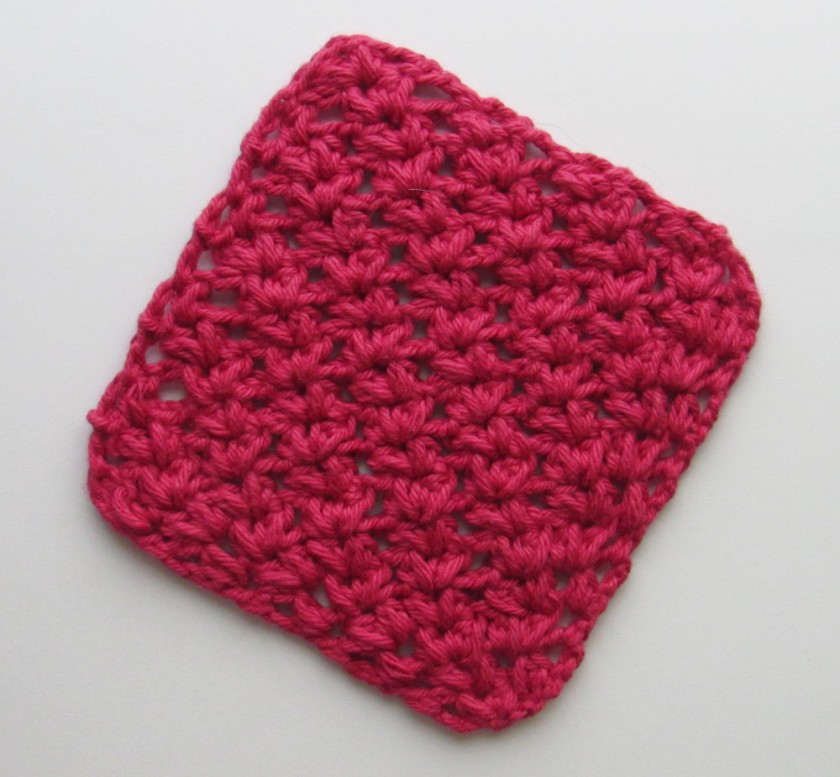
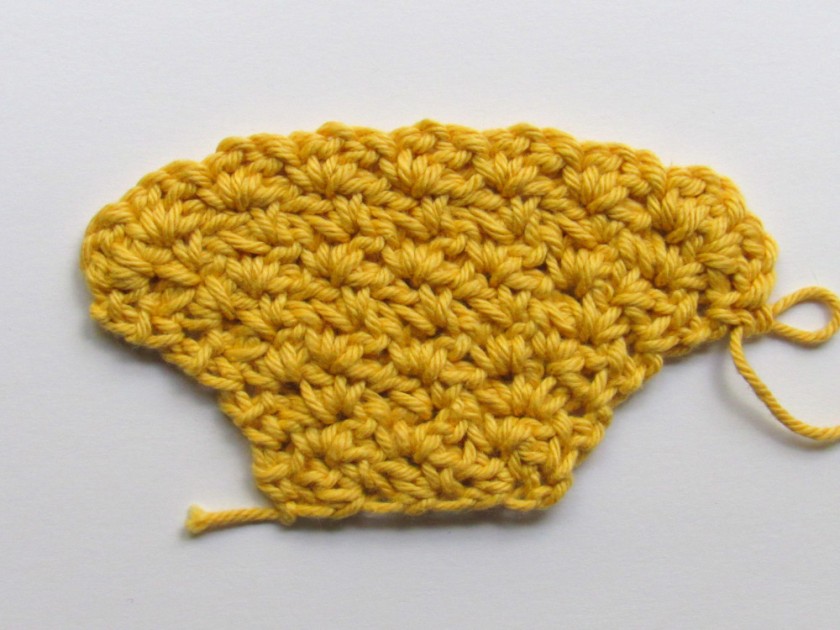
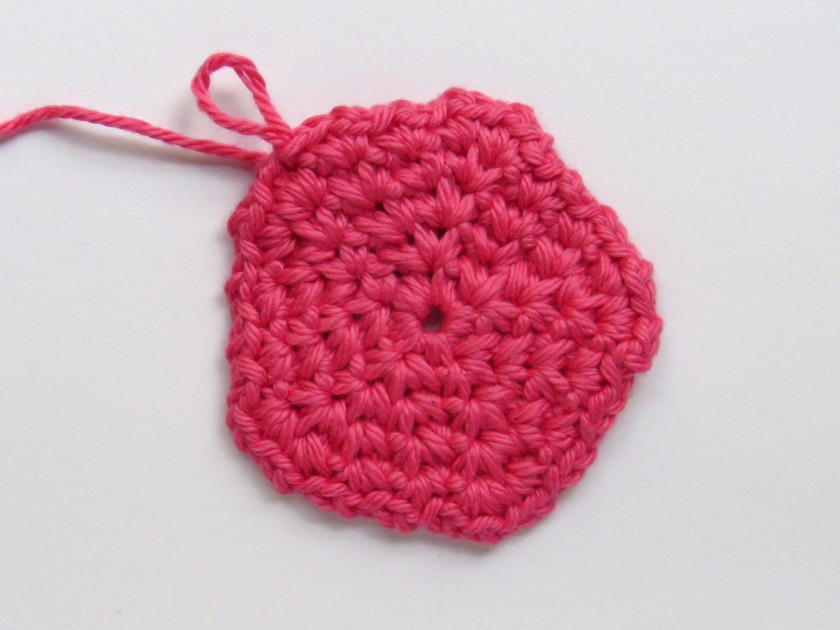
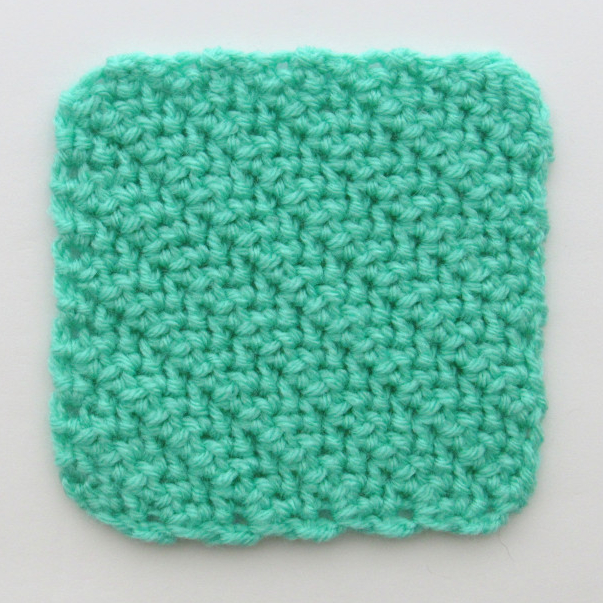
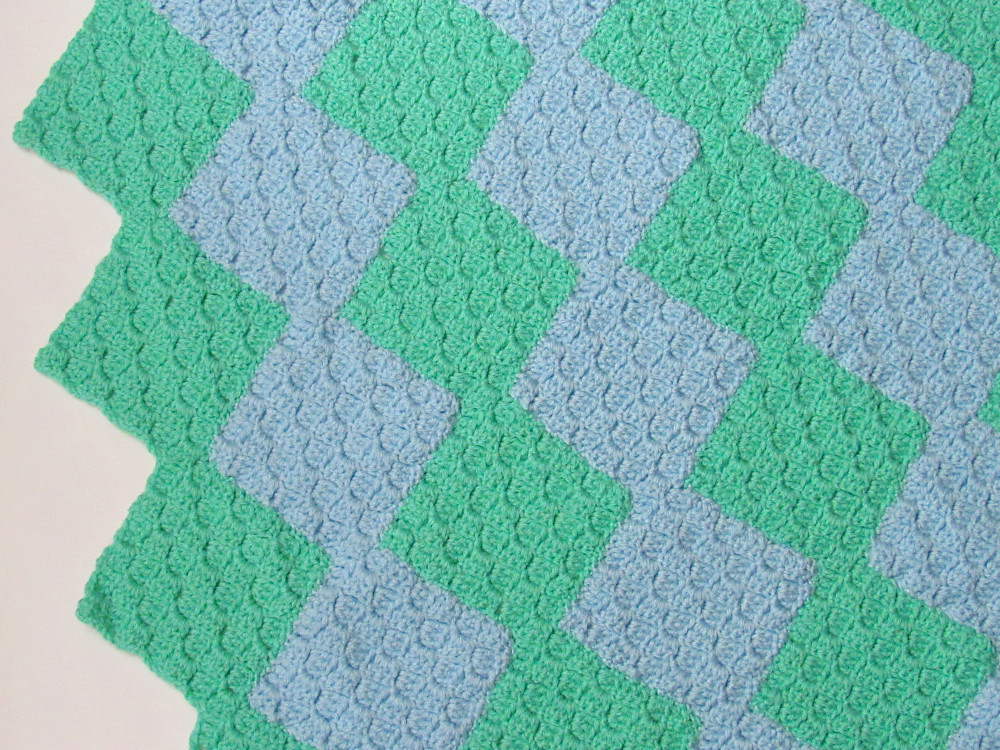
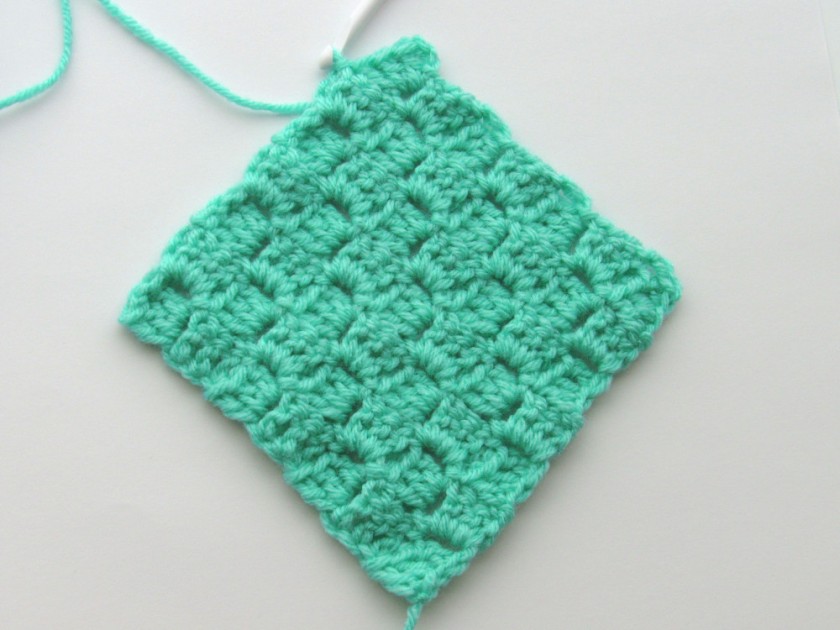
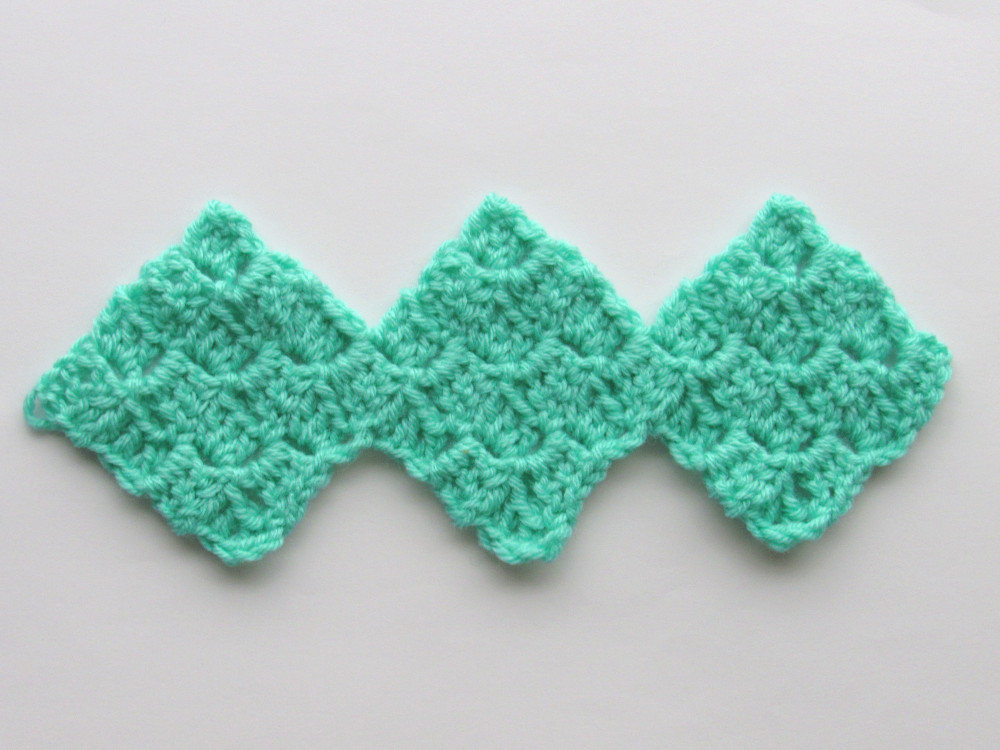
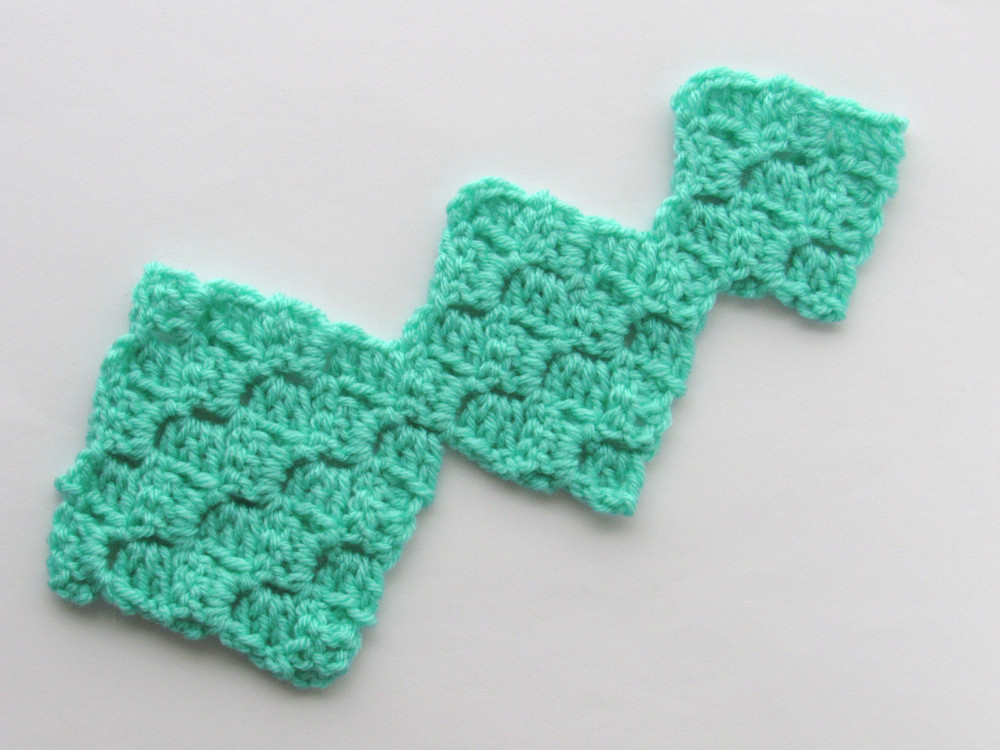
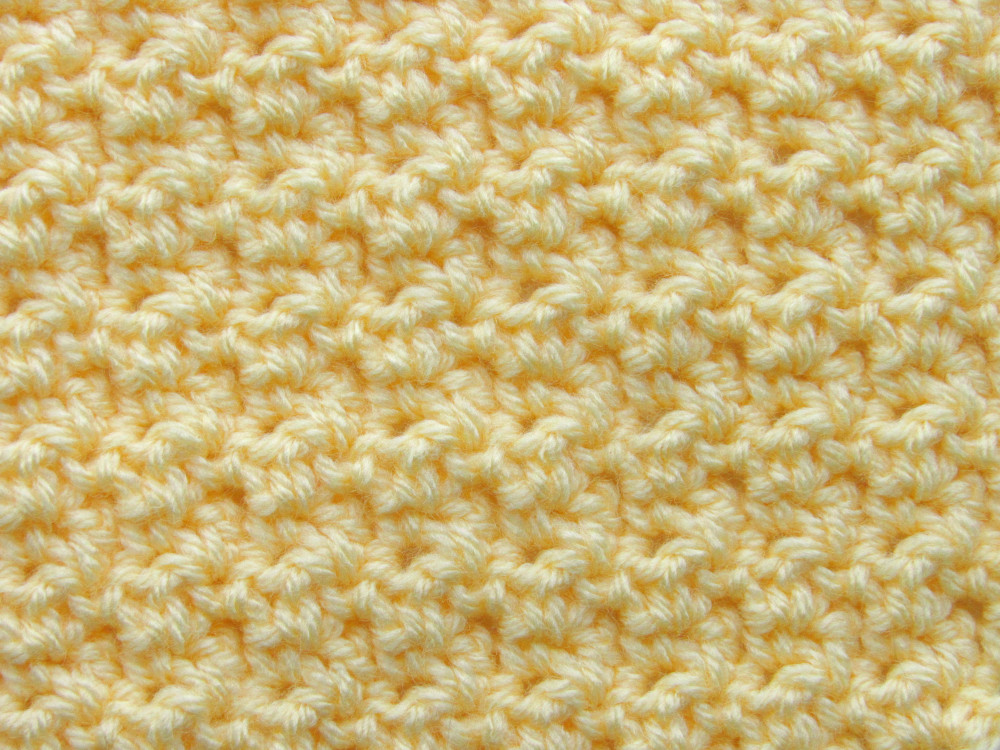
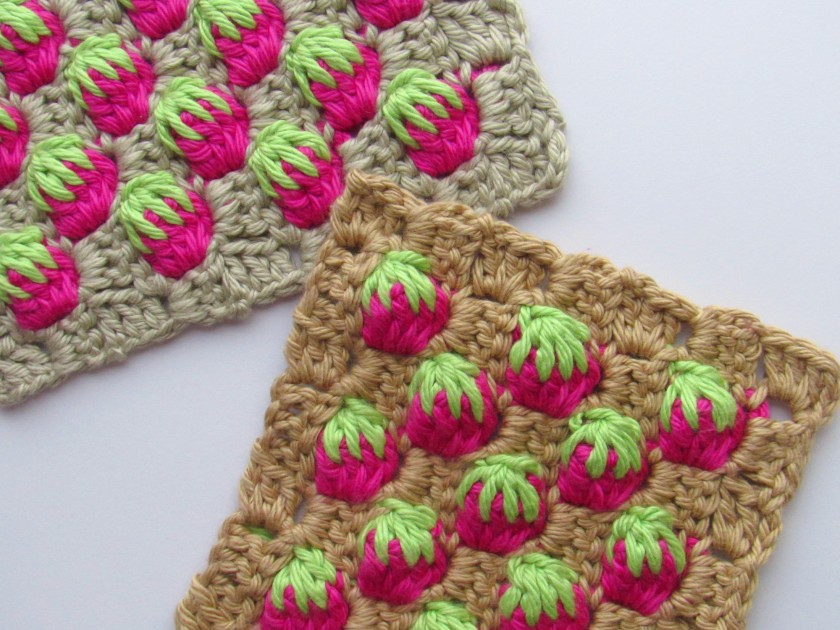
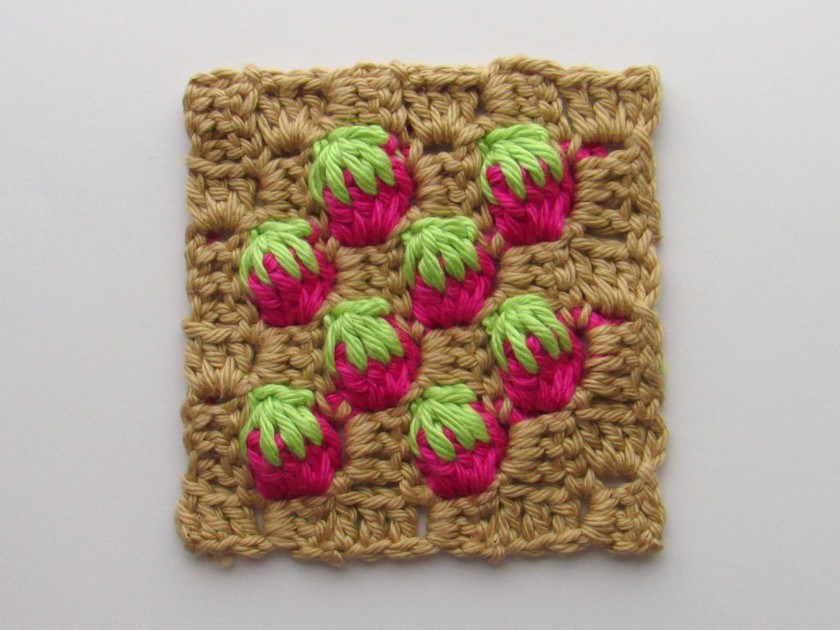
The C2C strawberry stitch is a C2C stitch variation that creates a crochet piece with strawberry stitches that have a slightly puffed up or raised texture. Every row of the pattern starts and ends like a regular C2C crochet project by making a set of (ch 3, 3 dc) stitches. In between these starting stitches are either rows of (ch 3, 3 dc) sets or rows of strawberry stitches.

For this tutorial, the strawberry stitch is a modified popcorn stitch. It involves making a ch-3 space that will be worked in on the next row and a popcorn stitch with a cap. Color B is used for both the ch-3 and popcorn stitch and Color C is used for the strawberry cap. Color A is not used in the strawberry stitch itself, but is picked up at the end to make a slip stitch in the next ch-3 space.

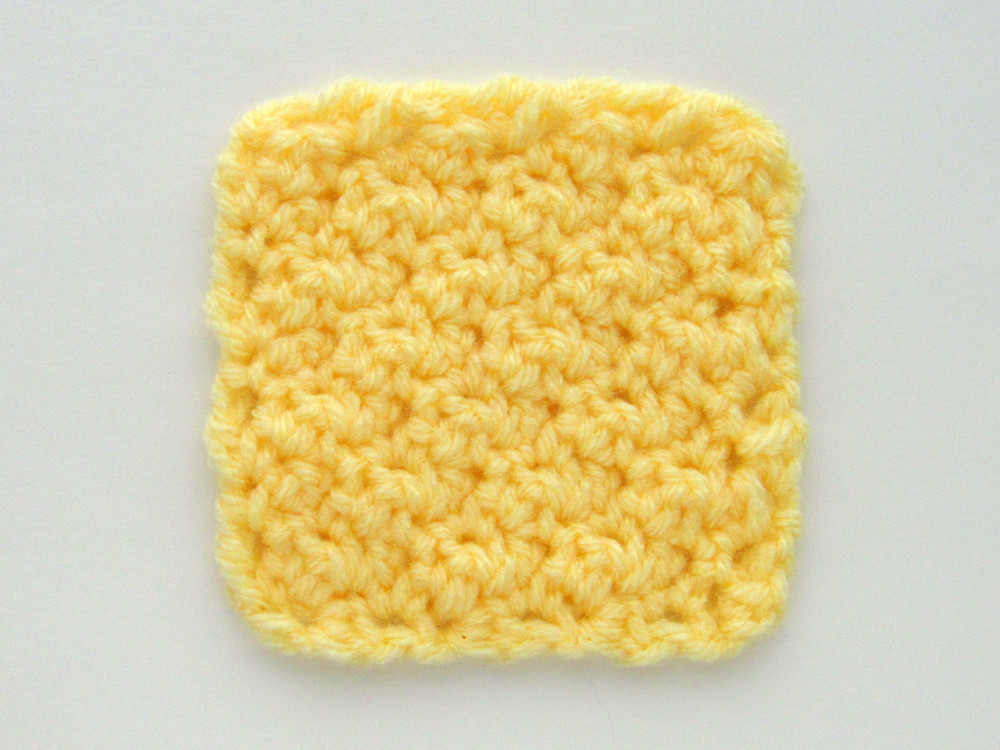
Below are written instructions for how to make a C2C strawberry stitch square. You can favorite it on ravelry here. For a pdf version with photos and instructions for making a rectangle, check out the etsy listing here.

Materials needed:
Three (3) colors of yarn in the same weight:
Color A: any color other than green and red
Color B: a red color
Color C: a green color
Any hook size
Yarn needle to weave in end

The yarns used in this tutorial are Knit Picks Shine Worsted in the following colors:
Color A: Willow for Sections One and Two, Platinum for Section Three
Color B: Cosmopolitan
Color C: Green Apple
The hook size used with these yarns is G.

Pattern Abbreviations (in US terms):
ch: chain stitch
st/sts: stitch/stitches
sl st: slip stitch
ch- space: space made by chain stitches from a previous row
dc: double crochet stitch
strawberry: strawberry stitch (instructions for how to make in tutorial notes)
* * : repeat instructions in between asterisks as often as indicated
( ) : stitches in between ( ) are worked in the same stitch

How to make a C2C strawberry stitch:

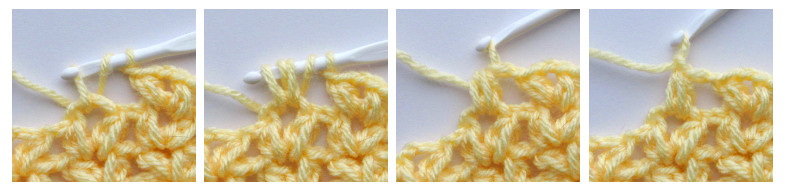
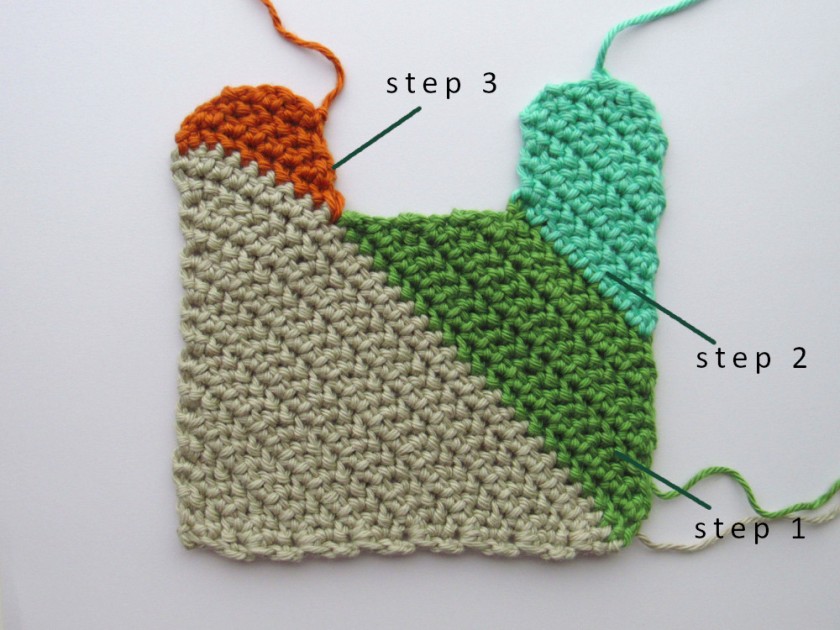
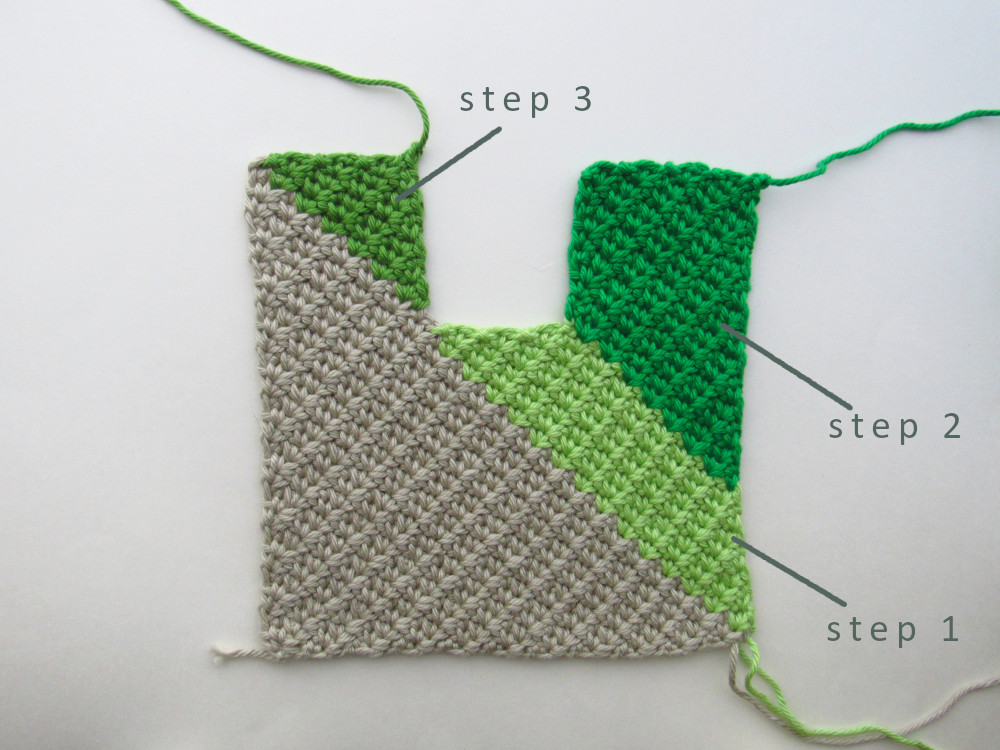
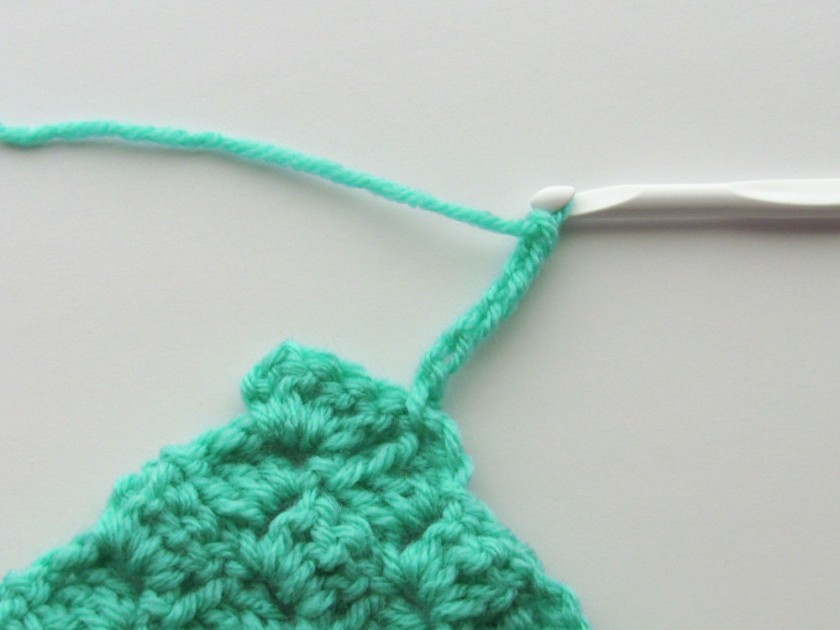
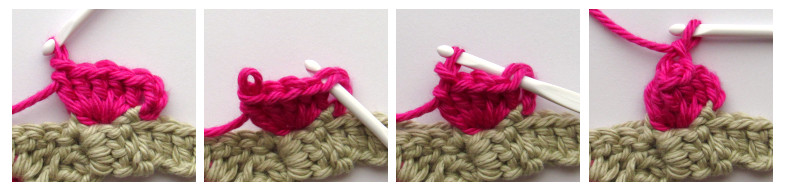
Step 1: After making a sl st in the ch-3 space with color A, switch to
Color B and chain 3.

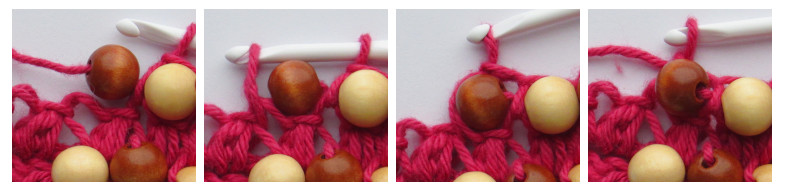
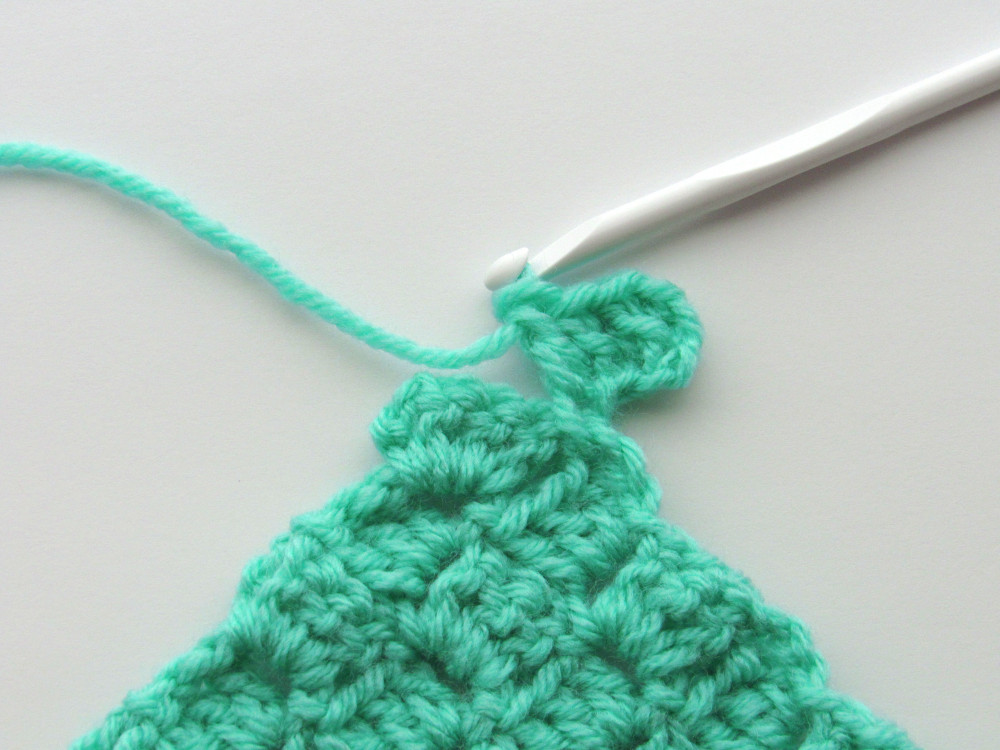
Step 2: With Color B, make a popcorn stitch.
1. Make 5 dc in the same ch-3 space.
2. Remove your hook from the last dc and insert it in the first dc of the set.
3. From the back, insert your hook into the loop from the fifth dc.
4. Pull the loop through the back of the first dc to the front and ch 1 to secure the popcorn stitch.

A four panel image showing step 2, making a crochet popcorn stitch

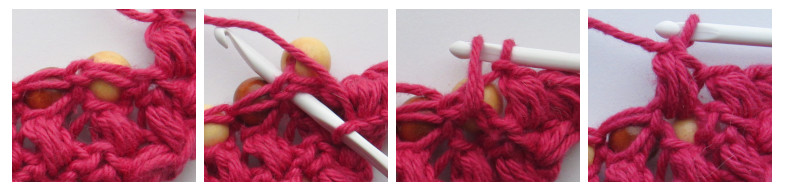
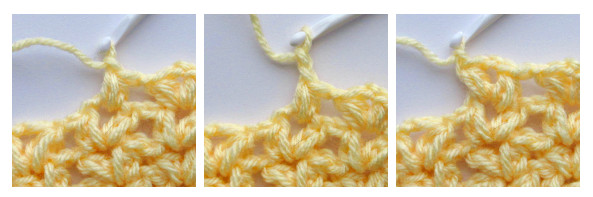
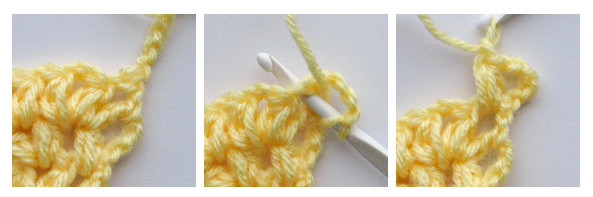
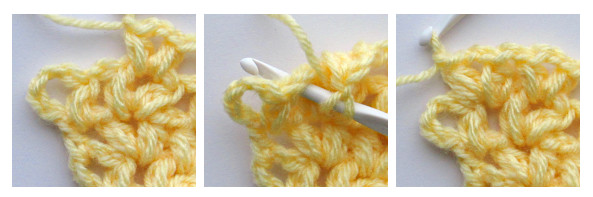
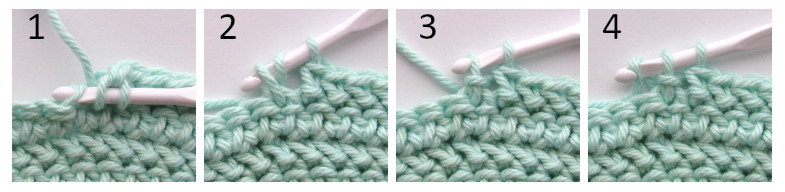
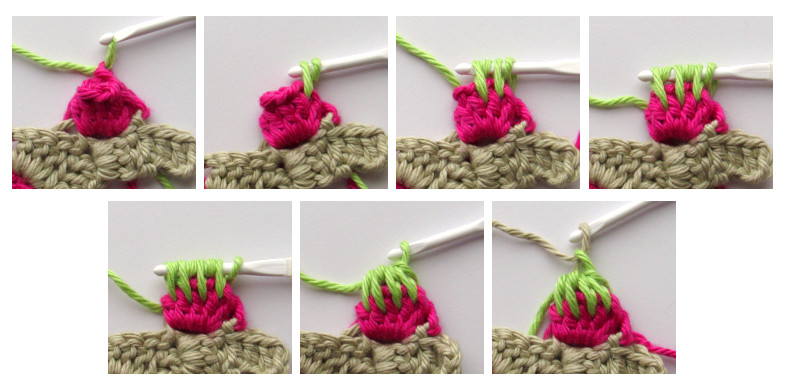
Step 3: With Color C, make the cap. When pulling up loops between stitches, insert your hook towards the bottom of the stitches.
1. Pull up a loop with Color C.
2. Insert your hook between the first and second dc of the popcorn stitch and pull up a loop (two loops on the hook).
3. Yarn over, insert your hook between the second and third dc of the popcorn stitch and pull up a loop (four loops on the hook).
4. Yarn over, insert your hook between the third and fourth dc of the popcorn stitch and pull up a loop (six loops on the hook).
5. Yarn over, insert your hook between the fourth and fifth dc of the popcorn stitch and pull up a loop. (eight loops on the hook).
6. Pull through all eight loops on the hook.
7. Switch to Color A and pull up a loop.

a seven panel image showing step 3, making the cap of the strawberry stitch

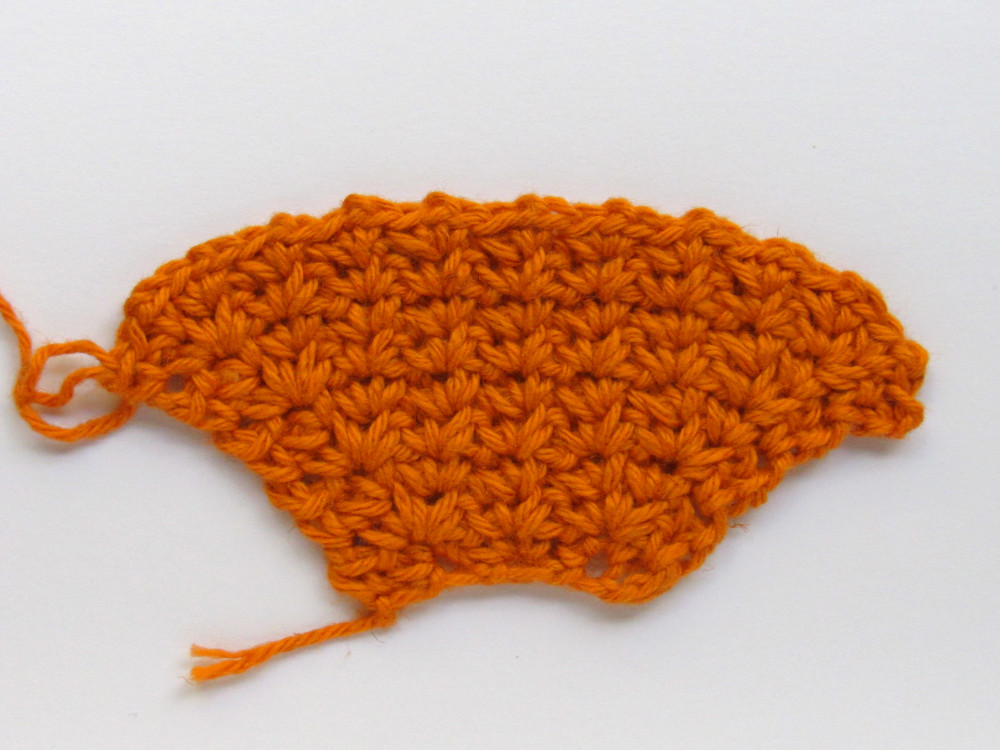
STARTING THE C2C STRAWBERRY SQUARE

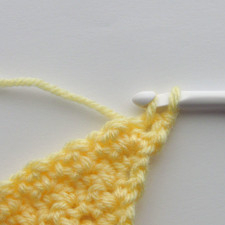
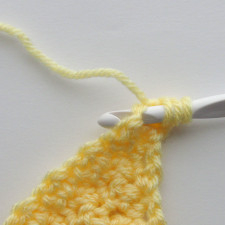
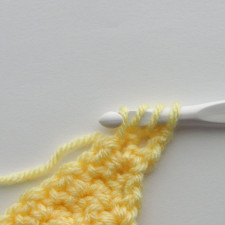
Row 1: With Color A, ch 6 and make a dc in the 4th, 5th, and 6th chs from the hook.

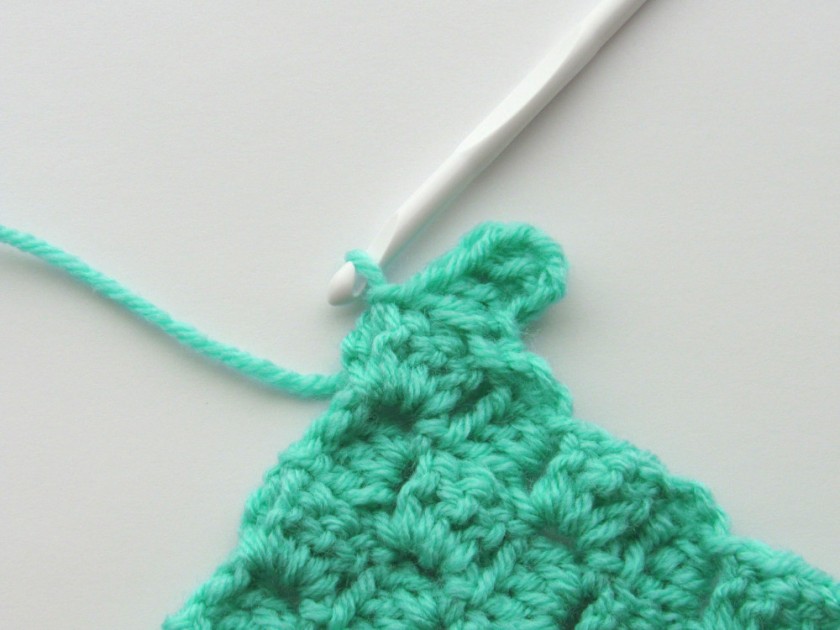
Row 2: With Color A, turn your work and ch 6. Make a dc in the 4th, 5th, and 6th chs from the hook. Make a sl st in the ch-3 space from the previous row, ch 3 and make 3 dc.

Row 3: With Color A, turn your work and ch 6. Make a dc in the 4th, 5th, and 6th chs from the hook. Make a sl st in the ch-3 space from the previous row, switch to Color B and ch 3. With Colors B and C, make a strawberry. Switch to Color A and sl st in the last ch-3 space, ch 3 and make 3 dc.

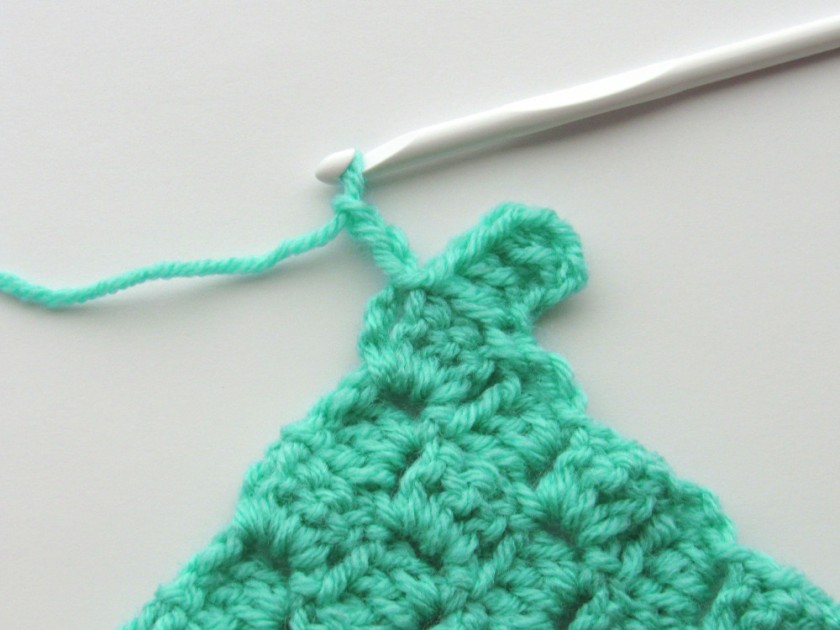
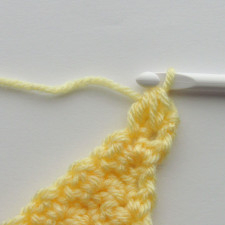
Row 4 (Repeat Row): With Color A, turn your work and ch 6. Make a dc in the 4th, 5th, and 6th chs from the hook. Make a sl st in the first ch-3 space from the previous row, ch 3 and make 3 dc. *Make a sl st in the next ch-3 space, ch 3 and make 3 dc.* Repeat * * for the rest of the ch-3 spaces of the row.

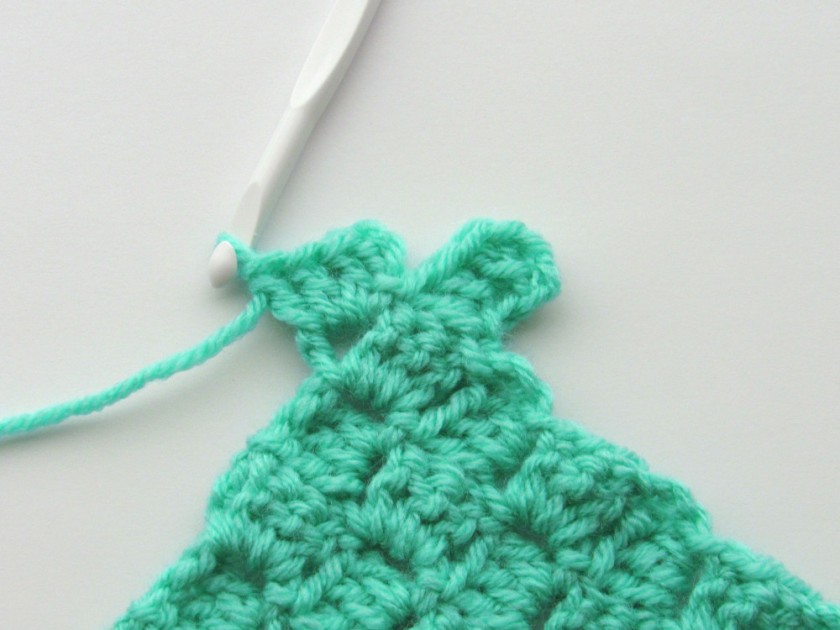
Row 5 (Repeat Row): With Color A, turn your work and ch 6. Make a dc in the 4th, 5th, and 6th chs from the hook. Make a sl st in the first ch-3 space, switch to Color B and ch 3. With Colors B and C make a strawberry. *With Color A, make a sl st in the next ch-3 space, switch to Color B and ch 3. With Colors B and C make a strawberry.* Repeat * * until you reach the last ch-3 space. Switch to Color A and sl st in the last ch-3 space, ch 3 and make 3 dc.

Repeat Rows 4 and 5 until you reach the size you want.
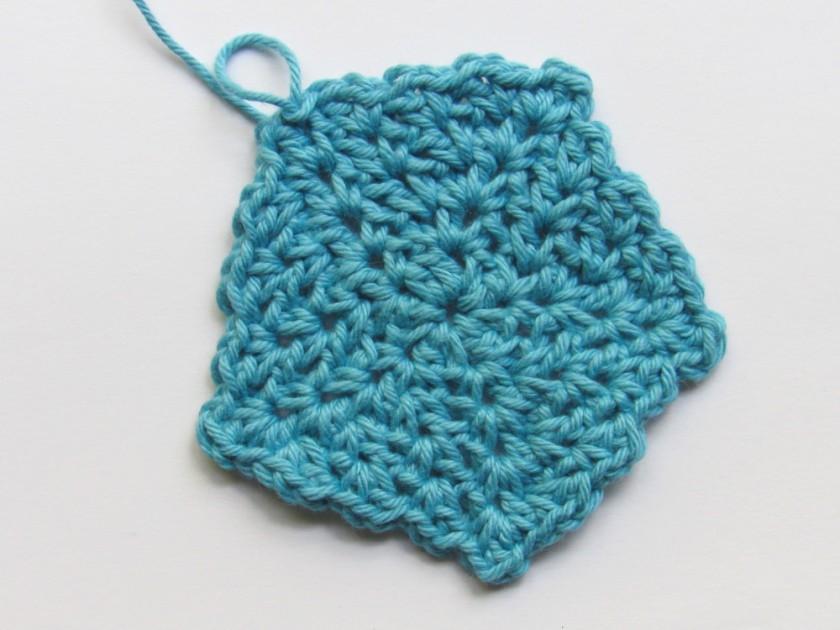
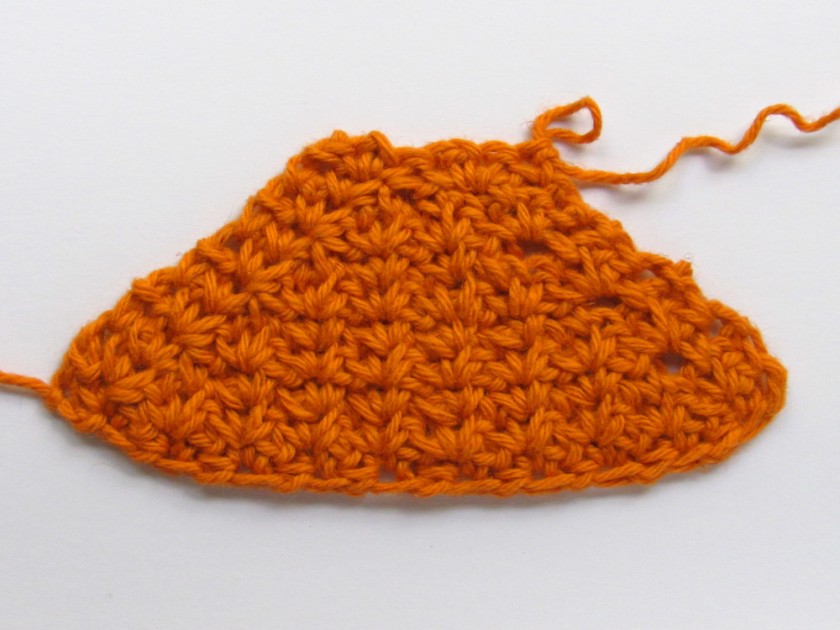
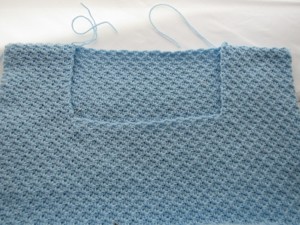
CLOSING YOUR SQUARE

Your starting row in this section depends on your last row of Section One. If the last row of Section One is a Row 4, start with Row 1 then move to Row 2. If the last row of Section One is a Row 5, start with Row 2 then move to Row 1.

a photo of a c2c crochet strawberry stitch square. the non-strawberry stitch parts are a light brown color, and the strawberries are red and green.
A square that started on a Row 1
a photo of a c2c crochet strawberry stitch square. the non-strawberry stitch parts are a light brown color, and the strawberries are red and green.
A square that started on a Row 2

Row 1 (Repeat Row): With Color A, turn your work, ch 1 and make a sl st in each dc to the first ch-3 space. Sl st in the ch-3 space, ch 3 and make 3 dc. *With Color A, make a sl st in the next ch-3 space, switch to Color B and ch 3. With Colors B and C, make a strawberry.* Repeat * * until you reach the last 2 ch-3 spaces. Switch to Color A and make a sl st in the next ch-3 space, ch 3 and make 3 dc. Move to the last ch-3 space and make a sl st.

Row 2 (Repeat Row): With Color A, turn your work, ch 1 and make a sl st in each dc to the first ch-3 space. Sl st in the ch-3 space, ch 3 and make 3 dc. *Make a sl st in the next ch-3 space, ch 3 and make 3 dc.* Repeat * * until you reach the last ch-3 space. Make a sl st in the last ch-3 space.

Repeat Rows 1 and 2 until you complete the row with either three sets of (ch 3, 3 dc) stitches or two sets of (ch 3, 3 dc) with a strawberry between them. Move to Rows 3 and 4 to finish your square.

Row 3: With Color A, turn your work, ch 1 and make a sl st in each dc to the first ch-3 space. Sl st in the ch-3 space, ch 3 and make 3 dc. Make a sl st in the next ch-3 space, ch 3 and make 3 dc. Make a sl st in the last ch-3 space.

Row 4: With Color A, turn your work, ch 1 and make a sl st in each dc to the first ch-3 space. Sl st in the ch-3 space, ch 3 and make 3 dc. Make a sl st in the last ch-3 space.

C2C BEAN STITCH, WITH BEADS

an image showing a pink c2c crochet bean stitch square with pink beads in it that form a border around the piece
an example of a c2c crochet bean stitch square featuring beads

Here’s a way to incorporate beads in a C2C bean stitch crochet piece. This method can be used in non-C2C bean stitch pieces, but I’ve only used this for C2C pieces.

There are a couple of rules to follow when using beads. First, only use beads in the inside sections of the C2C piece. The first and the last stitch of a row will be a bean stitch but you can add beads at any point between those two stitches. (This means you won’t use beads in the first and last two rows of a square or rectangle because you need at least one bean stitch at the beginning and one stitch at the end of a row.) Second, you’ll alternate between rows featuring beads and rows of only bean stitches. And third, you need to use a bead that is about the same size as the bean stitches.

You can use beads in a line, alternate between bean stitches and beads, or space beads out in any other way as long as you follow the three rules above.

an image of a red c2c crochet bean stitch piece with several brown beads in it
An incomplete C2C bean stitch piece with beads in it.

ADDING A BEAD

The steps for adding a bead are:

  1. work your c2c bean stitch piece as usual until you get to the stitch where you want to add a bead
  2. holding your bead close to your hook, insert your hook into the stitch below and pull up a loop about the height of your bead
  3. make a slip stitch
  4. chain one
  5. Either work a bean stitch in the next stitch or repeat steps 1-4 to add another bead
an image featuring four panels showing the steps for crocheting a bead in a bean stitch piece
Steps 1 – 4 for adding a bead

Where to work your bean stitches after a bead row

an image featuring four panels that show how to make a crochet bean stitch in a bead below it

Since you’re alternating between rows with beads and rows with only bean stitches, you are only going to make a bean stitch in a bead space. To do this, insert your hook in the space to the left of the bead in the row below. Pull up a loop and continue to make your bean stitch as usual.

CORNER TO CORNER/C2C V-PUFF STITCH

a photo of a bright red, crochet c2c V-puff stitch square oriented in a diamond position. The V-puff stitch is a reversible crochet stitch made up of two puff stitches separated by a ch-1 space.

The V-puff stitch may not be one of my go-to crochet stitches but it holds a special place in my heart because, well, it looks like a heart. A year or more ago, I tried working up a C2C V-puff piece and couldn’t get past the beginning building up part to the closing part. It was a mess of inconsistent tension and weird shaping. After gaining some more experience working with other bulky C2C projects, I figured out that the puff stitches I was using were too bulky. That’s why I used only 5 loop puff stitches for this C2C stitch pattern. When working up a C2C V-puff piece, you may notice that the corners curl up a bit. The curling is more noticeable with smaller pieces than larger ones. This is normal and should go away after blocking. I recommend making a test piece with your intended yarn and blocking it to make sure the curling is fixed.

A written pattern for this stitch is below. If you want a pdf version of the pattern that includes photos and instructions for making rectangles, you can find it here at my etsy shop. You can favorite it at ravelry here.

Materials:
Any yarn or hook can be used for this pattern.

Stitch abbreviations (in US terms):
ch/s: chain stitch, chain stitches
st/sts: stitch/stitches
dc: double crochet stitch
Puff: puff stitch
V-puff: V-puff stitch

THE PUFF STITCH

The puff stitch is made by drawing up multiple loops in a single stitch before closing the stitch and securing it with a chain stitch. This pattern uses a 5-loop puff stitch.

A four panel image showing the steps for making a 5-loop puff stitch.

How to make a an 5-loop Puff stitch:
1. Yarn over, insert your hook into the stitch, yarn over and pull through the stitch (3 loops on the hook).
2. Yarn over, insert your hook into the same stitch, yarn over and pull through the stitch (5 loops on the hook).
3. Yarn over and pull through all loops on the hook.
4. Ch 1 to secure your puff.

A four panel image showing the steps for making a V-puff stitch using 5-loop puff stitches.

How to make a V-Puff stitch:
The V-puff stitch is made by making two puff stitches separated by a ch-1 space. For this pattern, the V-puff stitches use 5-loop puffs. To make a V-puff stitch:
1. Make one 5-loop puff stitch.
2. Chain one.
3. Make one 5-loop puff stitch.

WHERE TO MAKE PUFF STITCHES

While most of the single puff and V-puff stitches are made in the ch-1 spaces of previous V-puff stitches, some stitches are made in between stitches at the beginning and end of a row.

To make a a single puff stitch in between a double crochet and puff stitch:

A three panel image showing how a puff stitch is made between a dc and puff stitch.

Yarn over and insert your hook in the space in between the dc and the nearest puff of the V-puff stitch of the previous row. Complete your puff and finish the row as indicated by the pattern.

To make a V-puff stitch in between a V-puff stitch and single puff stitch:

A three panel image showing how a V-puff stitch is made between a V-puff and puff stitch.

Yarn over and insert your hook in the space in between the second puff of the V-puff stitch and the single puff of the previous row. Complete your puff and finish the row as indicated by the pattern.

C2C V-PUFF STITCH SECTION ONE: STARTING THE SQUARE

Row 1: ch 4 and make a V-puff and a dc in the 4th ch from the hook.
Row 2: turn your work and ch 4. Make a puff in the space between the dc and the V-puff of the previous row. Make a V-puff in the ch-1 space from the V-puff of the previous row. Make a dc in the ch-3 space.
Row 3: turn your work and ch 4. Make a puff in the space between the dc and the first V-puff of the previous row. Make a V-puff in the ch-1 space from the V-puff of the previous row. Make a V-puff in the space between the last V-puff and the single puff of the previous row. Make a dc in the ch-4 space.
Row 4: turn your work and ch 4. Make a puff in the space between the dc and the first V-puff of the previous row. Make a V-puff in every ch-1 space of the V-puffs of the previous row. Make a V-puff in the space between the last V-puff and the single puff. Make a dc in the ch-4 space.
Row 5+: Repeat Row 4. Your piece will start to get triangular in shape. When you reach the desired size, move on to Section Two to make a square.

C2C V-PUFF STITCH SECTION TWO: CLOSING THE SQUARE

Row 1: turn your work and ch 3. Make a puff in the space between the dc and the V-puff of the previous row. Make a V-puff in the ch-1 spaces of each of the V-puffs from the previous row. Skip the single puff and make a dc in the ch-4 space.
Row 2: turn your work and ch 2. Make a puff in the ch-1 space of the first V-puff of the previous row. Make a V-puff in the ch-1 spaces of the remaining V-puffs. Skip the single puff and make a dc in the ch-3 space.
Row 3: turn your work and ch 2. Make a puff in the ch-1 space of the first V-puff of the previous row. Make a V-puff in the ch-1 spaces of the remaining V-puffs. Skip the single puff and make a dc in the ch-2 space.
Row 4+: Keep repeating Row 3 until you finish the row with only one puff and one V-Puff. Then move to the Final Row.
Final Row: turn your work and ch 2. Make a V-puff in the ch-1 space of the V-puff of the previous row. Skip the single puff and make a sl st in the ch-2 space.

CORNER TO CORNER/C2C HERRINGBONE HDC NECKLINE SHAPING

C2C spider stitch neckline shaping

C2C herringbone hdc stitch pattern

I recently made a C2C hhdc sweater and was able to use the same method from my C2C spider stitch sweater to create a neckline. It just required a couple of simple adjustments for the calculations of the A, B, and C sections, and the number of rows needed for Step 2.

Materials needed:
Stitch markers
Something to write these numbers down on

The shaping starts when you’re ready to close your square or rectangle. If you’ve been working a square, you can start the shaping after any row. However, if you’ve been working a rectangle, the shaping needs to start on the edge where the slip stitches are made. For this example I’ve worked up to 30 hhdc. With this number of hhdc, we’re going to calculate three sections: A, B, and C. A and C are the shoulder sections, while B is the neckline.

First, take the total number of hhdc stitches (in this case, 30) and divide it by two. This is the number of stitches for the C section.
30/2 = 15
C = 15

Take a stitch marker and count 15 hhdc from the start of the next row. Place the marker in the 15th hhdc st. This is the marker for C.

Then, using the number 15, you are going to calculate A and B. These numbers are going to be used to shape the neckline and the shoulder depth. Since A is the shoulder and B is the neckline, the larger A is, the shorter the neckline will be. A larger B will make smaller shoulder sections. For this example, I’ll make A larger.
Decide the number of sets you want A to be then subtract that from 15 to get B.
A = 8
B = 7

Take a stitch marker and count 7 stitches from the marker for C. Place a marker in the 7th hhdc. This is the marker for B. Move to the next stitch and place a marker. This is the marker for A. Count the remaining stitches to make sure there are 8 hhdc (and a ch-2 space) left.
Here’s what the set up is before we start:

a photo taken of an unfinished beige c2c hhdc crochet piece, in a triangular shape. The long edge has three stitch markers labeled stitch marker A, B, and C. The bottom right corner is labeled as the start of a new row.

C2C HHDC STITCH – NECKLINE/SHOULDER SHAPING METHOD

a photo taken of a small, multicolor c2c hhdc piece with neckline shaping. The bottom third is a beige color, the top left is an orange color, the middle right is a dark green and the top right is a light green color. The orange is labeled step 3, the dark green is labeled step 1, and the light green is labeled step 2.

STEP 1: Sections B and C worked together.

Row 1 (when starting with a square): turn your work and ch 1. Starting from the first hhdc of the previous row, make a hhdc in each st from the previous row until you reach stitch marker B. Make a sl st in the hhdc where stitch marker B is.
-or-
Row 1 (when starting with a rectangle): turn your work and ch 1. Skip 1 st (the previous sl st) and make a sl st in the next st. Ch 1 and make a hhdc in each hhdc from the previous row until you reach stitch marker B. Make a sl st in the hhdc where stitch marker B is.
Row 2: turn your work and ch 1. Skip 1 st (the previous sl st) and make a sl st in the next st. Ch 1 and make a hhdc in the next and every hhdc until the last hhdc of the previous row. Make a sl st in the last hhdc.
Row 3+: Repeat Row 2 until you’ve made a sl st in the hhdc before stitch marker C. Move on to STEP 2.

STEP 2: Section C worked only

Part 1:
You’re going to make 2 calculations before starting this step. First, divide A by 2. If A is an odd number, estimate down to an even whole number.
8/2 = 4
This is the total number of rows needed for Part 1.

Second, calculate the number of rows needed after Rows 1 and 2. To determine this number, subtract 2 from the number you just calculated.
4 – 2 = 2 more rows
This means I’m going to repeat Row 1 and Row 2 each one more time. If I had a number like 6, that would mean I would repeat Row 1 and Row 2 3 more times each. You need to finish Part 1 on a Row 2.

IMPORTANT NOTE: If you end up making the final sl st right before stitch marker C at the beginning of the row (meaning if you continued the row you’d end at the edge of the piece, where you started Row 1 of Step 1) then don’t finish the row and start Row 1 right after you make the sl st. So you’d make the final sl st, ch 2, make a hhdc in the next and every hhdc until the last hhdc of the previous row, and make a sl st in the last hhdc.

Row 1: turn your work and ch 2. Starting from the first hhdc of the previous row, make a hhdc in the next and every hhdc until the last hhdc of the previous row. Make a sl st in the last hhdc.
Row 2: turn your work and ch 1. Skip 1 st (the previous sl st) and make a sl st in the next st. Ch 1 and make a hhdc in the next and every hhdc until the ch-2 space of the previous row. Make 2 hhdc in the ch-2 space.
Row 3 – 4: repeat Rows 1 and 2

Part 2:
Row 5: turn your work and ch 1. Make a hhdc in the first and every hhdc until the last hhdc. Make a sl st in the last hhdc.
Row 6: turn your work and ch 1. Skip 1 st (the previous sl st) and make a sl st in the next st. Ch 1 and make a hhdc in the next and every hhdc until the last hhdc of the previous row. Make a sl st in the last hhdc.
Row 7+: repeat Row 5 until you have 2 hhdc remaining. Fasten off and cut your yarn. Move to STEP 3.

STEP 3: Section A worked only

If A is an even number:
Row 1:
Insert your hook in the stitch to the right of stitch marker A, pull up a loop and ch 1. Make a hhdc in the hhdc marked by stitch marker A and in each hhdc to the ch-2 space. Make a sl st in the ch-2 space.
If A is an odd number:
Row 1:
Insert your hook in the stitch to the right of stitch marker A, pull up a loop and ch 1. Make a sl st in the hhdc marked by stitch marker A and ch 1. Make a hhdc in the next and every hhdc of the previous row to the ch-2 space. Make a sl st in the ch-2 space.
Row 2: turn your work and ch 1. Skip 1 st (the previous sl st) and make a sl st in the next st. Ch 1 and make a hhdc in the next and every hhdc until the last hhdc of the previous row. Make a sl st in the last hhdc.
Row 3+: repeat Row 2 until you have 2 hhdc remaining. Fasten off and cut your yarn.

Crochet wattle stitch: increases, decreases, and working in the round

Since both the spider stitch and the wattle stitch are worked in the ch-1 spaces of the previous row, the ways to increase and decrease the stitches are very similar. So I’m sharing the methods I’ve used to increase/decrease the wattle stitch that can be used horizontally with rows and in the round with rounds.

CROCHET ABBREVIATIONS (U.S.)

sc: single crochet stitch
dc: double crochet stitch
ch: chain stitch
ch-1: chain one space, the space made by a ch stitch between two other stitches
wattle: wattle stitch, a stitch made up of sets of [sc, ch-1, dc] in the ch-1 spaces of the previous row
wattle inc: wattle stitch increase, a set of [sc, ch-1, dc, ch-1, sc] made in the same ch-1 space
sc inc: single crochet increase
dc dec: double crochet decrease
[ ]: everything in the brackets is worked in the same stitch

Increases:

A yellow wattle stitch crochet piece that gets wider with each row.
A sample of wattle stitch crochet increases made at each end of every other row.

Increasing can be easily done by adding a [ch-1, sc] to the end of a wattle stitch. This means making a set of [sc, ch-1, dc, ch-1, sc] where you want to make an increase.

To make a spider stitch increase:
1. Insert your hook in a ch-1 space and make a [sc, ch-1, dc]
2. Ch-1 and make a sc in the same ch-1 space as the [sc, ch-1, dc]

When you start the next row, make sure to make a wattle in both ch-1 spaces of the increase.

Decreases:

A yellow wattle stitch crochet piece where the sides get narrower with each row.
A sample of wattle stitch crochet decreases. On the right are decreases made with the “sc in the first ch-1 space, ch-1, dc in the second ch-1 space” method. On the left are decreases made with the “sc, ch-1, dc dec” method.

Like with the spider stitch, I’ve found two ways to make a wattle decrease. The first method spaces out the [sc, ch-1, dc] across two ch-1 spaces. The second method starts with making a [sc, ch-1] in the first stitch and finishes with a dc decrease across the first and second ch-1 spaces.

Method 1:
1. Insert your hook in the first ch-1 space and make a sc
2. Ch 1
3. Insert your hook in the second ch-1 space and make a dc

I recommend trying this method out before committing to using this on a crochet piece because it makes really large gaps in your work.

Method 2:
1. Insert your hook in the first ch-1 space and make a sc
2. Ch-1
3. Yarn over and insert your hook into the same ch-1 space. Yarn over and pull up a loop (three loops on the hook)
4. Yarn over and pull through two loops (two loops on the hook)
5. Yarn over and insert your hook in the second ch-1 space. Yarn over and pull up a loop (four loops on the hook)
6. Yarn over and pull through two loops (three loops on the hook)
7. Yarn over and pull through all three loops (0ne complete dc dec made)

WORKING IN THE ROUND:

A blue wattle stitch crochet pentagon shaped piece
A wattle stitch crochet piece worked in the round.

Like with the spider stitch, you can work the wattle stitch in the round by taking the regular pattern instructions for working in the round and substituting those stitches with wattle stitches. For example, a basic pattern for crocheting in the round looks like this:
Use the magic loop method and make 5 sc (5 sc)
Round 1: scinc in each stitch (10 sc)
Round 2: (sc, scinc) 5 times (15 sc)
Round 3: (2 sc, scinc) 5 times (20 sc)
Round 4: (3 sc, scinc) 5 times (25 sc)

The pattern instructions for crocheting in the round with the wattle stitch would look the same, just with wattles instead of scs.

Use the magic loop method and make 5 wattle stitches (5 ch-1 spaces)
Round 1: wattle inc in each stitch (10 ch-1 spaces)
Round 2: (wattle, wattle inc) 5 times (15 ch-1 spaces)
Round 3: (2 wattle, wattle inc) 5 times (20 ch-1 spaces)
Round 4: (3 wattle, wattle inc) 5 times (25 ch-1 spaces)

Because the wattle stitch contains a sc and dc, the increases can make more pronounced corners than when working in the round with only one type of stitch.

Crochet spider stitch: increases, decreases, and working in the round

When I first learned the spider stitch, I found plenty of great tutorials for working the crochet spider stitch but I couldn’t find anything really for how to make increases and decreases. So I experimented a bit and found that I could easily make increases and decreases by adding or subtracting ch-1 spaces. The methods I’m sharing here are methods I’ve used to work the spider stitch horizontally and in the round.

CROCHET ABBREVIATIONS (U.S.)

sc: single crochet
ch: chain
ch-1: chain one space, the space made by a ch stitch between two other stitches
spider: spider stitch, a stitch made up of sets of [sc, ch-1, sc] in the ch-1 spaces of the previous row
spider inc: spider stitch increase, a set of [sc, ch-1, sc, ch-1, sc] made in the same ch-1 space
sc inc: single crochet increase
sc dec: single crochet decrease
[ ]: everything in the brackets is worked in the same stitch

Increases:

An orange spider crochet piece that gets wider with each row.
A sample of spider stitch crochet increases made at each end of every other row.

Increasing can be easily done by adding a [ch-1, sc] to the end of a spider stitch. This means making a set of [sc, ch-1, sc, ch-1, sc] where you want to make an increase.

To make a spider stitch increase:
1. Insert your hook in a ch-1 space and make a [sc, ch-1, sc]
2. Ch-1 and make a sc in the same ch-1 space as the [sc, ch-1, sc]

When you start the next row, make sure to make a [sc, ch-1, sc] in both ch-1 spaces of the increase.

Decreases:

An orange spider crochet piece where the sides get narrower with each row.
A sample of spider stitch crochet decreases made at each end of every other row. On the right are decreases made with the “sc in the first ch-1 space, ch-1, sc in the second ch-1 space” method. On the left are decreases made with the “scdec, ch-1, sc” method.

I’ve found two ways to make a decrease. The first method spaces out the [sc, ch-1, sc] across two ch-1 spaces. The second method makes a sc decrease across two ch-1 spaces, then finishes with a [ch-1, sc] in the second ch-1 space.

Method 1:
1. Insert your hook in the first ch-1 space and make a sc
2. Ch 1
3. Insert your hook in the second ch-1 space and make a sc

This method makes a larger ch-1 space than the normal spider stitch so I don’t recommend using it for pieces where the stitches are intended to be close together. It could make for a decorative design element though.

Method 2:
1. Insert your hook in the first ch-1 space and draw up a loop
2. Insert your hook in the second ch-1 space and draw up a loop
3. Yarn over and pull through both loops on the hook (one sc dec made)
4. Ch 1
5. Insert your hook in the second ch-1 space and make a sc

WORKING IN THE ROUND:

A pink spider crochet circle
A spider stitch crochet piece worked in the round.

Crocheting in the round to make a circle usually involves using sc, hdc, or dc stitches. You can take pattern instructions for working in the round and substitute those stitches with spider stitches. For example, a basic pattern for crocheting in the round looks like this:
Use the magic loop method and make 5 sc (5 sc)
Round 1: scinc in each stitch (10 sc)
Round 2: (sc, scinc) 5 times (15 sc)
Round 3: (2 sc, scinc) 5 times (20 sc)
Round 4: (3 sc, scinc) 5 times (25 sc)

The pattern instructions for crocheting in the round with the spider stitch would look the same, just with the spider stitch instead of scs.

Use the magic loop method and make 5 spider stitches (5 ch-1 spaces)
Round 1: spider inc in each stitch (10 ch-1 spaces)
Round 2: (spider, spider inc) 5 times (15 ch-1 spaces)
Round 3: (2 spider, spider inc) 5 times (20 ch-1 spaces)
Round 4: (3 spider, spider inc) 5 times (25 ch-1 spaces)

Since the spider stitch is bulkier than sc, hdc, and dc stitches, it’s important to use a small number of spider stitches when working in the round or the gap in the center from closing the magic ring will be large.

C2C HERRINGBONE HDC STITCH

a photo of a green C2C herringbone hdc crochet square
A green C2C herringbone hdc square made with Knit Pick’s acrylic Brava yarn

This is possibly my favorite C2C variation I’ve worked on so far. Like the lemon peel stitch, this stitch has a really wonderful texture that seems to work well with any type of yarn. The herringbone hdc stitch is a simple variation on the normal hdc stitch that really changes the look and texture of the hdc stitch. The herringbone hdc stitches are slanted stitches that, unlike the hdc stitch, don’t have the appearance of a straight line created by a front loop. Instead, a line of little bumps is made.

a photo of a pink C2C herringbone hdc crochet square
A pink C2C herringbone hdc square made from Knit Pick’s Dishie cotton yarn

Unlike the normal herringbone hdc stitch, where the lines would run horizontally from one side to the other, the lines in the C2C herringbone hhdc stitch piece run diagonally, starting from one corner at the bottom and running to the top corner on the opposite side of the piece. The basics of this method are making a ch-2 space at the beginning of each row that will be worked in at the end of the next row. This means you’ll be making an increase of two stitches per row. When it comes to decreasing, with the exception of the first decrease row, a total of two decreases will be made per row. One decrease will be made at the beginning of a row while the second will be made at the end. You should always have an even number of stitches for each row.

As a little aside for those wondering about substituting the herringbone hdc with the herringbone dc stitch: my first attempts at a C2C herringbone variation were with the herringbone dc stitch and I could not find a way to create a square that had a similar stretchiness along the starting and closing sides. The sides created at the beginning were so much more elastic than the closing sides. So, if you’re thinking about using this method to make a triangle, then substituting the herringbone hdc with a herringbone dc would be fine. However, I don’t recommend this change for creating a square.

Below are text instructions for making a C2C herringbone hdc stitch crochet square. A pdf download of this pattern that contains step-by-step photo guides along with instructions for making a C2C herringbone hdc rectangle can be found at my etsy shop here. You can also favorite/queue it on ravelry here.

Materials needed:
Any kind of yarn
A crochet hook in a size appropriate for the yarn used
Yarn needle for weaving in ends

Stitch abbreviations (in US terms):
C2C: Corner to Corner Crochet
ch: chain stitch
hhdc: herringbone hdc stitch
sl st: slip stitch
st/sts: stitch/stitches

Notes:

A. HOW TO MAKE A HERRINGBONE HDC STITCH

  1. Yarn over, insert your hook into the stitch. (Two loops on the hook.)
  2. Yarn over and pull through the stitch. (Three loops on the hook.)
  3. Do not yarn over. Pull the left loop through the middle loop. (Two loops on the hook.)
  4. Yarn over and pull through the remaining 2 loops.
a four panel image that, from left to right, shows one of the four steps for making the herringbone hdc stitch

B. ch-2 spaces: a ch-2 space will be created at the beginning of each row. This space will not be worked in until the end of the following row. That space might be hard to get to if you’re not used to it. So after chaining 2 at the start of the row, take a stitch marker and place it around the chain that’s closest to the hook before you make the next stitch. This can help you find that space when it needs to be worked in the next row.

C. ch-1 spaces and slip stitches: In the “CLOSING YOUR SQUARE” section, you will see instructions to “turn your work and ch 1” and to “make a sl st, ch 1, and make a hhdc” . These ch 1 spaces and slip stitches will not be worked in later in the pattern. 

STARTING THE C2C HERRINGBONE HDC STITCH

Row 1: ch 3 and make 2 hhdc in the third chain from the hook.

Row 2: turn your work and ch 2. Make a hhdc in the 3rd st from the hook (the last hhdc of the previous row) and in the next st. Make 2 hhdc in the ch-2 space.

Row 3: turn your work and ch 2. Starting from the 3rd st from the hook (the last hhdc of the previous row), make a hhdc in each st to the ch-2 space. Make 2 hhdc in the ch-2 space.

Row 4+: Repeat Row 3, starting each row with a ch 2 and making a hhdc in each stitch until you get to the ch-2 space at the end, where you work 2 hhdc.

CLOSING YOUR SQUARE

Row 1: turn your work and ch 1. Starting from the first hhdc of the previous row, make a hhdc in each st to the ch-2 space. Make a sl st in the ch-2 space.

Row 2: turn your work and ch 1. Skip 1 st (the previous sl st) and make a sl st in the next st. Ch 1 and make a hhdc in the next and every hhdc until the last hhdc. Make a sl st in the last hhdc.

Row 3+: Keep repeating Row 2 until you have 4 hhdc sts left. Then move to the Final Row.

Final Row: turn your work and ch 1. Skip 1 st (the previous sl st) and make a sl st in the next. Ch 1 and make a hhdc in the next 2 sts. Make a sl st in the last st.

C2C Spider Stitch: Shoulder/Neckline Shaping

I recently made a C2C spider stitch drop shoulder sweater. It was improvised, so the method was basically making C2C spider stitch squares, pinning them together to see how they would fit, and adjusting as needed. There was a lot of experimenting and frogging going on with this project, but I’m really happy with the result because I figured out a way to do neckline shaping with a C2C square. (I haven’t tried this with any other C2C variation yet, though I’m pretty sure this shaping method would basically work the same for them.) I only worked this shaping for the front side though it could be used for both sides. To finish the neckline, I crocheted rows of regular spider stitches along the neckline.

The incomplete neckline section of a blue C2C spider stitch sweater
The incomplete neckline section of a C2C spider stitch sweater
The completed neckline of a blue C2C spider stitch sweater, with straight rows of spider stitch edging
The completed neckline section of a C2C spider stitch sweater, with straight spider stitch edging

For once I actually took notes during a project, so I’m going to share them here. I’m just starting to play around with this method, so I don’t have any hard rules for calculating the numbers needed, just suggestions. I worked this a couple of times to get the shape I wanted, and you’ll probably have to do the same if you try it out.

Materials needed:
Stitch markers
Something to write these numbers down on

The shaping starts when you’re ready to close your square. You’ll need to have an even number of rows. For this example I’ve worked 22 rows (21 sets of [sc, ch 1, sc] and one set of ch-1 space and a sc.). With this number of sets, we’re going to calculate three sections: A, B, and C. A and C are the shoulder sections, while B is the neckline.

First, take the total number of sets (in this case, 22) and divide it by two.
22/2 = 11
C = 11

Take a stitch marker and count 11 sets from the start of the next row. Place the marker in the ch-1 space of the 11th set. This is the marker for C.

Then, using the number 11, you are going to calculate A and B. These numbers are going to be used to shape the neckline and the shoulder depth. Since A is the shoulder and B is the neckline, the larger A is, the shorter the neckline will be. The larger B is, the shorter the shoulders will be. For my sweater, I divided the number in half and that made the shoulders and neck about the same size. But for this example, I’ll make A larger.
Decide the number of sets you want A to be then subtract that from 11 to get B.
A = 7
B = 4

(A will also be the total number of rows worked in the Part 1 of Section 2, so make sure to write that number down.)

Take a stitch marker and count 4 sets from the marker for C. Place a marker in the ch-1 space of the 4th set. This is the marker for B. Move to the next ch-1 space and place a marker. This is the marker for A. Count the remaining sets to make sure there are 6 sets left. Those are sets (plus the set with stitch marker A) should be equal to section A.

Here’s what the set up is before we start:

a photo showing the triangular shape of a beige C2C square at the step before the square is closed. The start of the new row is labeled, along with three stitch markers at the top.

This shaping is going to be worked in three parts. The picture below is the finished neckline shaping for the example I’m working here. I’ve used different shades of green yarn to illustrate how each completed step looks.

The beige c2c square that has three sections for a neckline added onto it: a light green for step 1, bright green for step 2, and a forest green for step 3.

SHOULDER/NECKLINE SHAPING STEPS

STEP 1: Sections B and C worked together.

Row 1: ch 1 and work (sc, ch 1, sc) in each ch-1 space from the previous row until you reach stitch marker B. Make a sl st in the ch-1 space where stitch marker B is.
Row 2: turn your work and ch 1. Work (sc, ch 1, sc) in each ch-1 space to the last ch-1 space. Sl st in the last ch-1 space.
Row 3: Repeat Row 2 until you’ve made a sl st in the ch-1 space before stitch marker C. Move on to STEP 2.

STEP 2: Section C worked only

Part 1:
You’re going to have to calculate 2 numbers before starting this step: the number of rows needed after Rows 1 and 2 and the number of times Rows 1 and 2 need to be repeated. The total number of rows worked in Part 1 is equal to the number for section A. To determine the number of rows needed after Rows 1 and 2, subtract 2 from A.
7 – 2 = 5
The last row worked is not going to be a repeat of Row 1 or 2, so you’ll need to subtract 1 from that to get the number of times Rows 1 and 2 need to be repeated.
5 – 1 = 4

Row 1: turn your work and ch 2. Make a sc in the 2nd ch from the hook and (sc, ch 1, sc) in each ch-1 space from the previous row until the last ch-1 space. Sl st in the last ch-1 space.
Row 2: turn your work and ch 1. Make (sc, ch 1, sc) in each ch-1 space from the previous row
Row 3 – 6 repeat Rows 1 and 2
Row 7 (the last row): turn your work and ch 1. Make (sc, ch 1, sc) in each ch-1 space until the end. Sl st in the last ch-1 space.

Part 2:
Row 8+: repeat Row 7
Optional last row: turn your work and ch 1, make a sc in the ch-1 space of the previous row.
Fasten off and cut your yarn. Move to STEP 3.

STEP 3: Section A worked only

Row 1: Insert your hook in the sc before stitch marker A, pull up a loop and ch 1. Make (sc, ch 1, sc) in the ch-1 spaces of the previous row until the last ch-1 space. Sl st in the last ch-1 space.
Row 2: turn your work and ch 1. Make (sc, ch 1, sc) in the ch-1 spaces of the previous row until the last ch-1 space. Sl st in the last ch-1 space.
Row 3+: repeat Row 2
Optional last row: turn your work and ch 1, make a sc in the ch-1 space of the previous row.
Fasten off and cut your yarn.

CONNECTED C2C SQUARES

Squares and rectangles aren’t the only shapes that can be made using the C2C crochet method; you can make simple adjustments to the basic C2C instructions to create other kinds of shapes.

a partially folded up green and blue striped C2C crochet blanket, where the stripes are panels shaped like connected diamonds

Here is a blanket I made using two differing panels of connected C2C squares. The green panels are seven connected squares long, while the blue panels are six connected squares long.

The way these squares are connected makes them look like panels of connected diamond shapes.

A partial section of a green and blue striped C2C crochet blanket, where the stripes are panels that look like connected diamonds

There are no special stitches or unusual tricks to do this. If you know how to make a C2C square, you can easily connect them. All you have to do is make a C2C square and instead of finishing with one set of (ch 3, 3dc), you turn your work and start another row.

MAKING A CONNECTED C2C SQUARE

I’m using KnitPick’s Brava Sport yarn, color Tranquil, and an I size hook in the photos below.

a completed C2C crochet square, made of green yarn
a completed C2C square

To start, complete a C2C square. Instead of fastening off, turn the piece and work a new row, the Connecting Row.

Connecting Row: Chain 6 and make a dc in the 4th, 5th, and 6th chains from the hook. Make a sl st in the ch-3 space of the last row, chain 3 and make 3 dc in the ch-3 space.

Below is a step-by-step breakdown of the Connecting Row. (I’m basically working what would be considered Row 2 of the instructions for a C2C square.)

the top of a green C2C crochet square, with the new row of chain 6

chain 6

the top of a green C2C crochet square, with a new row of a ch-3 space and 3 dc

make 3 dc across 4th, 5th and 6th chains from the hook

the top of a green C2C crochet square, with a new row of a ch-3 space and 3 dc and a sl st made in the ch-3 space of the previous row

sl st in the ch-3 space of the previous row

the top of a green C2C crochet square, with a new row of a ch-3 space and 3 dc and a sl st and ch 3 made in the ch-3 space of the previous row

chain 3

the top of a green C2C crochet square, with a new row of a ch-3 space and 3 dc and a "sl st, ch 3, 3dc" made in the ch-3 space of the previous row

make 3 dc in the ch-3 space

Then I keep working the steps for a C2C square and fasten off when I complete the square.

An image of two connected C2C crochet squares, that look like two connected diamond shapes, made from green yarn
Two connected C2C squares

To keep adding connected squares, I would simply repeat the Connecting Row when I reach the end of a square until I have the number of squares that I want.

a panel of three connected C2C crochet squares, made of green yarn
a panel of three connected C2C squares of the same size

There are many ways you can get creative with this method. For example, you can make panels where each square is a different size than the others.

a panel of three connected C2C crochet squares, made of green yarn, where, starting from the left, each one is smaller than the other.
a panel of three connected C2C squares, where each square is smaller than the next

You can also use different color yarn for each square by using any crochet method for changing colors at the start of the row. For this example, before I chained 6 to start the Connecting Row, I switched to the second color and chained 6. Then I pulled on both of the yarn ends to secure them in place.

two connected C2C crochet squares, where the one on the left is a dark orange color and the one on the right is a light pink color
two connected C2C crochet squares, made from KnitPick’s CotLin yarn, colors Clementine (left) and Flamingo (right)

If you’re planning on making multiple panels to be joined/sewn together like the blanket above, it’s important to plan it out before you start making panels. Each panel side should have the same amount of rows as the panel it’s being joined to. Otherwise, you’re likely to get bunching and irregular shaping.

As you can see, the corner of one square is going to line up with the connected section of the other square. I’ve drawn lines to show where each side connects.

two connected C2C crochet square panels lined up next to each other. The colors of the top row are (from left to right) light pink, coral, and dark orange. The colors of the bottom panel are (left to right) dark orange and light pink. Grey lines show where each panel connects to another.

C2C LEMON PEEL STITCH

a view of 3/4th of a yellow c2c lemon peel stitch crochet square, positioned so that one corner is on the top, one is on the left, and one is on the right.
a C2C lemon peel stitch square, made out of Knit Pick’s Brava Sport yarn, color Custard, and a size I crochet hook.

Almost every description of the lemon peel stitch mentions how it looks like an actual lemon peel and I don’t know, maybe if I take my glasses off it does? It’s surprising that a stitch pattern consisting of two alternating stitches creates so much texture. I’ve tried this stitch with several different types of yarn and it maintains this nice definition with every one.

close up picture of the c2c lemon peel stitch made of yellow yarn
a close-up of the C2C lemon peel stitch

A basic description of the lemon peel stitch is working alternating single crochet and double crochet stitches across any number of stitches. Depending on the number of stitches, you either always start with a single crochet (even number of stitches) or alternate between starting with a single crochet or double crochet (odd number of stitches).

a yellow, c2c lemon peel stitch crochet square
a C2C lemon peel stitch square

This C2C lemon peel stitch pattern is going to modify the lemon peel stitch at the beginning and the end of the rows to create a C2C piece that runs on the bias. It starts with creating a ch-2 space at the beginning of each row that will be worked in at the end of the next row. This means you’ll be making an increase of two stitches per row. When it comes to decreasing, with the exception of the first decrease row, a total of two decreases will be made per row. One decrease will be made at the beginning of a row while the second will be made at the end.

Below are text instructions for making a C2C lemon peel stitch crochet square. A pdf download of this pattern that contains step-by-step photo guides along with instructions for making a C2C lemon stitch rectangle can be found at my etsy shop here. You can also favorite/queue it on ravelry here.

Materials:
Any kind of yarn
A crochet hook in a size appropriate for the yarn used
Yarn needle for weaving in ends
Stitch markers are recommended for marking the ch-2 spaces created at the beginning of rows.

Stitch abbreviations (in US terms):
C2C: Corner to Corner Crochet
ch: chain stitch
sc: single crochet
dc: double crochet
sc/dc dec: sc/dc decrease
st/sts: stitch/stitches
* *: repeat instructions in between asterisks as often as indicated
[ ]: everything in the brackets is worked in the same stitch

Notes:

A. The pattern refers to this as a “sc/dc decrease (sc/dc dec)”. To make a sc/dc dec, complete the following steps:

  1. Insert your hook into the first stitch, yarn over and pull through (2 loops on the hook).
  2. Yarn over and insert your hook into the second stitch (3 loops on the hook).
  3. Yarn over and pull through the second stitch (4 loops on the hook).
  4. Yarn over and pull through 2 loops (3 loops on the hook).
  5. Yarn over and pull through the remaining 3 loops.
step one of the scdc crochet decrease, where a loop is drawn up in the first stitch
Step 1
step two of the scdc crochet decrease, where a yarn over is made before inserting the hook in the second stitch
Step 2
step three of the scdc crochet decrease where a loop is pulled up in the second stitch
Step 3
the fourth step of the scdc crochet decrease, where there is a yarn over pulled through the first two loops on the hook
Step 4
the fifth and final step of the scdc crochet decrease, where there is a yarn over pulled through the three loops on the hook
Step 5

B. ch-2 spaces: a ch-2 space will be created at the beginning of each row. This space will not be worked in until the end of the following row. That space might be hard to get to if you’re not used to it. So after chaining 2 at the start of the row, take a stitch marker and place it around the chain that’s closest to the hook before you make the next stitch. This can help you find that space when it needs to be worked in the next row.

C. In the “CLOSING THE LEMON PEEL STITCH SQUARE” section, you will see the directions “turn your work and ch 1”. This ch 1 is a turning chain that does not count as a stitch and will not be worked in later in the pattern. 

STARTING THE C2C LEMON PEEL STITCH

Row 1: ch 3 and make [sc, dc] in the third chain from the hook.

Row 2: turn your work and ch 2. Make a sc in the third st from the hook (the dc of the previous row) and a dc in the next st (the sc of the previous row). Make [sc, dc] in the ch-2 space.

Row 3: turn your work and ch 2. Make a sc in the third st from the hook and a dc in the next st. Make a sc in the next st and a dc in the next st. Make [sc, dc] in the ch-2 space.

Row 4: turn your work and ch 2. Make a sc in the third st from the hook and a dc in the next st. *Make a sc in the next st and a dc in the next st.* Repeat * * to the ch-2 space. Make [sc, dc] in the ch-2 space.

Row 5+: Repeat Row 4. When you reach the desired size, move to the next section.

CLOSING THE C2C LEMON PEEL STITCH SQUARE

Row 1: turn your work and ch 1. Make a sc/dc dec across the first 2 sts. *sc in the next st, dc in the next st* Repeat * * to the last st and the ch-2 space. Make a sc/dc dec across the last st and the ch-2 space. 

Row 2: turn your work and ch 1. Make a sc/dc dec across the first 2 sts. *sc in the next st, dc in the next st* Repeat * * to the last 2 sts. Make a sc/dc dec across the last 2 sts.

Row 3+: Keep repeating Row 2 until you have 3 sts left. Then move to the Final Row. 

Final Row: turn your work and ch 1. Make a sc/dc dec in the first 2 sts, then a sc in the last st.  

Design a site like this with WordPress.com
Get started