I’m really excited about the new C2C stitch pattern I have out. I’ve combined my two favorite stitches, the bean stitch and the hhdc stitch, to create the “Herringbean” stitch. With this stitch, diagonal stripes are created by alternating between blocks of bean stitch and hhdc stitch rows.
This is the most complicated stitch pattern I’ve made because there’s several options for customizing a C2C herringbean piece. Along with the size and shape, you decide how many rows are in each block of stitches, how many times blocks are repeated, and with which stitch to start different parts of the pattern. Although sometimes frustrating, it was ultimately a fun experience expanding my crochet skills to a more advanced level.
For anyone interested in checking out the C2C herringbean stitch, I have it up at my etsy shop here.
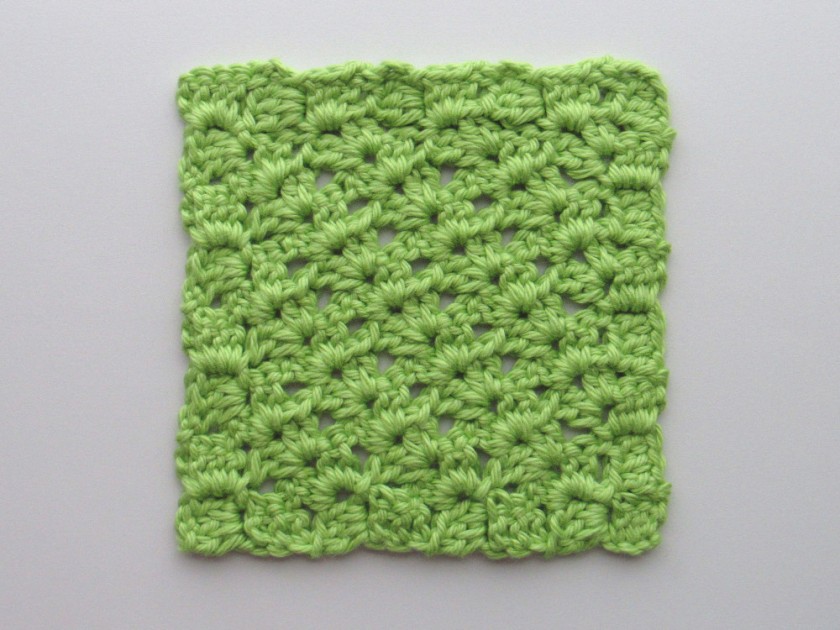
This C2C pattern combines two different elements: the V-stitch shell stitch and the C2C set of ch-3, 3 dc. The V-stitch shell stitch is a reversible stitch consisting of four double crochet stitches separated by a chain stitch in the middle. Working them in the C2C crochet method causes the rows of stitches to work up in a diagonal direction instead of horizontally. The 3 dc border allows for an easy way to join the square with other crochet pieces to create a variety of projects. The square created is about 5.25 inches in size.
The written instructions for this pattern are below. I’m only providing the pattern for making a square here, though the pdf version also includes a pattern for making a rectangle, along with photo guides and instructions for modifying the size. It can be found here at my etsy shop. You can favorite it on ravelry here.
Materials: Worsted weight yarn: 28 yards for one square Crochet Hook: G/4 mm Yarn needle for weaving in ends
Stitch abbreviations (in US terms): ch/s: chain stitch, chain stitches dc: double crochet stitch sl st: slip stitch st/sts: stitch/stitches * *: repeat instructions in between asterisks as often as indicated [ ]: everything in the brackets is worked in the same stitch
Calculating the Gauge: The gauge is calculated by measuring the sides of the square or rectangle. Six rows of the pattern equals 4 inches. To calculate the gauge, work Rows 1 – 6 of Section One in the pattern. The length of the sides should be 4 inches. If one side is slightly more or less than 4 inches, that is fine as long as the other side is 4 inches.
C2C V-STITCH SHELL WITH A 3 DC BORDER PATTERN
Row 1: ch 6 and make a dc in the 4th, 5th, and 6th chs from the hook. (This makes a ch-3 space and 3 dc.) Row 2: turn your work and ch 6. Make a dc in the 4th, 5th, and 6th chs from the hook. Make a sl st in the ch-3 space from the previous row, ch 3 and make 3 dc. Row 3: turn your work and ch 6. Make a dc in the 4th, 5th, and 6th chs from the hook. Move to the first ch-3 space from the previous row and make [2 dc, ch 1, 2 dc]. Sl st in the next ch-3 space, ch 3 and make 3 dc. Row 4: turn your work and ch 6. Make a dc in the 4th, 5th, and 6th chs from the hook. Move to the first ch-3 space from the previous row and make [2 dc, ch 1, 2 dc]. Make [2 dc, ch 1, 2 dc] in the ch-1 space from the [2 dc, ch 1, 2 dc] of the previous row. [sl st, ch 3, 3 dc] in the last ch-3 space. Row 5: turn your work and ch 6. Make a dc in the 4th, 5th, and 6th chs from the hook. Make [2 dc, ch 1, 2 dc] in the first ch-3 space from the previous row. *Make [2 dc, ch 1, 2 dc] in the ch-1 space from the [2 dc, ch 1, 2 dc] of the previous row.* Repeat * * one more time. [sl st, ch 3, 3 dc] in the last ch-3 space. Row 6: turn your work and ch 6. Make a dc in the 4th, 5th, and 6th chs from the hook. Make [2 dc, ch 1, 2 dc] in the first ch-3 space from the previous row. *Make [2 dc, ch 1, 2 dc] in the ch-1 space from the [2 dc, ch 1, 2 dc] of the previous row.* Repeat * * two more times. [sl st, ch 3, 3 dc] in the last ch-3 space. Row 7: turn your work and ch 6. Make a dc in the 4th, 5th, and 6th chs from the hook. Make [2 dc, ch 1, 2 dc] in the first ch-3 space from the previous row. *Make [2 dc, ch 1, 2 dc] in the ch-1 space from the [2 dc, ch 1, 2 dc] of the previous row.* Repeat * * three more times. [sl st, ch 3, 3 dc] in the last ch-3 space. Row 8: turn your work and ch 6. Make a dc in the 4th, 5th, and 6th chs from the hook. Make [2 dc, ch 1, 2 dc] in the first ch-3 space from the previous row. *Make [2 dc, ch 1, 2 dc] in the ch-1 space from the [2 dc, ch 1, 2 dc] of the previous row.* Repeat * * four more times. [sl st, ch 3, 3 dc] in the last ch-3 space. Row 9: turn your work and ch 1. Skip the first dc and make a sl st in the next 2 dc and the first ch-3 space. Ch 3 and make 3 dc in the ch-3 space. *Make [2 dc, ch 1, 2 dc] in the ch-1 space from the [2 dc, ch 1, 2 dc] of the previous row.* Repeat * * four more times. [sl st, ch 3, 3 dc] in the last ch-1 space. Sl st in the last ch-3 space. Row 10: turn your work and ch 1. Skip 1 st and make a sl st in the next 3 dc and the first ch-3 space. Ch 3 and make 3 dc in the ch-3 space. *Make [2 dc, ch 1, 2 dc] in the ch-1 space from the [2 dc, ch 1, 2 dc] of the previous row.* Repeat * * three more times. [sl st, ch 3, 3 dc] in the last ch-1 space. Sl st in the last ch-3 space. Row 11: turn your work and ch 1. Skip 1 st and make a sl st in the next 3 dc and the first ch-3 space. Ch 3 and make 3 dc in the ch-3 space. *Make [2 dc, ch 1, 2 dc] in the ch-1 space from the [2 dc, ch 1, 2 dc] of the previous row.* Repeat * * two more times. [sl st, ch 3, 3 dc] in the last ch-1 space. Sl st in the last ch-3 space. Row 12: turn your work and ch 1. Skip 1 st and make a sl st in the next 3 dc and the first ch-3 space. Ch 3 and make 3 dc in the ch-3 space. *Make [2 dc, ch 1, 2 dc] in the ch-1 space from the [2 dc, ch 1, 2 dc] of the previous row.* Repeat * * one more time. [sl st, ch 3, 3 dc] in the last ch-1 space. Sl st in the last ch-3 space. Row 13: turn your work and ch 1. Skip 1 st and make a sl st in the next 3 dc and the first ch-3 space. Ch 3 and make 3 dc in the ch-3 space. Make [2 dc, ch 1, 2 dc] in the ch-1 space from the [2 dc, ch 1, 2 dc] of the previous row. [sl st, ch 3, 3 dc] in the last ch-1 space. Sl st in the last ch-3 space. Row 14: turn your work and ch 1. Skip 1 st and make a sl st in the next 3 dc and the first ch-3 space. Ch 3 and make 3 dc in the ch-3 space. [sl st, ch 3, 3 dc] in the ch-1 space. Sl st in the last ch-3 space. Row 15: turn your work and ch 1. Skip 1 st and make a sl st in the next 3 dc and the first ch-3 space. Ch 3 and make 3 dc in the ch-3 space. Sl st in the last ch-3 space.
Finish your project by cutting your yarn, leaving a long tail, and pulling through your last worked stitch. Then use a yarn needle to weave your end in. Block your piece according to the type of yarn used.
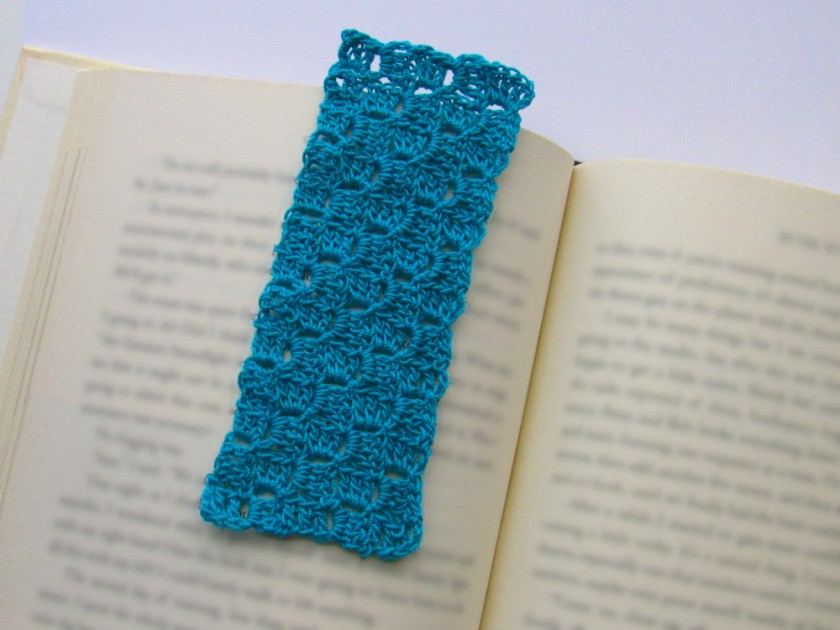
Example of a C2C rectangular bookmark made using green crochet thread
Last month I worked up a bunch of C2C crochet bookmark patterns using previous C2C stitch various seen here. Some of them are rectangular bookmarks and some are page corner bookmarks. Each can be found at my etsy shop. But here I’m providing the pattern for making a rectangular bookmark using the traditional C2C 3 dc stitch method. The pattern uses crochet thread and a size C crochet hook to create a rectangular bookmark that is about 2 inches wide and 5 inches long.
Skill Level: Beginner
Gauge: Five rows of the pattern equals 2 inches in height.
Stitch abbreviations (in US terms): C2C: Corner to Corner Crochet ch/s: chain stitch, chain stitches dc: double crochet stitch sl st: slip stitch st/sts: stitch/stitches : repeat instructions in between asterisks as often as indicated
CALCULATING THE GAUGE
The gauge is calculated by measuring the sides of the rectangle. Five rows of the pattern equals 2 inches. To calculate the gauge, work Rows 1 – 5 of the pattern. The length of the sides should be 2 inches. (One side may be slightly different, but that is fine as long as the other side is 2 inches.)
C2C RECTANGLE BOOKMARK PATTERN
Row 1: ch 6, make a dc in the 4th ch from the hook and the next 2 sts. (This is a ch-3 space and 3 dc.)
Row 2: turn your work and ch 6. Make a dc in the 4th ch from the hook and in the next 2 sts. Make a sl st in the ch-3 space from the previous row. Ch 3 and make 3 dc in the same ch-3 space.
Row 3: turn your work and ch 6. Make a dc in the 4th ch from the hook and in the next 2 sts. *Make a sl st in the ch-3 space from the previous row. Ch 3 and make 3 dc in the same ch-3 space. * Repeat * * one more time.
Row 4: turn your work and ch 6. Make a dc in the 4th ch from the hook and in the next 2 sts. *Make a sl st in the next ch-3 space from the previous row. Ch 3 and make 3 dc in the same ch-3 space.* Repeat two more times.
Row 5: turn your work and ch 6. Make a dc in the 4th ch from the hook and in the next 2 sts. *Make a sl st in the next ch-3 space from the previous row. Ch 3 and make 3 dc in the same ch-3 space.* Repeat three more times.
Row 6: turn your work and ch 6. Make a dc in the 4th ch from the hook and in the next 2 sts. *Make a sl st in the next ch-3 space from the previous row. Ch 3 and make 3 dc in the same ch-3 space. * Repeat three more times. Make a sl st in the last ch-3 space.
Row 7: turn your work and ch 1. Skip the sl st of the previous row and make a sl st in the next 3 dc and the ch-3 space from the previous row. Ch 3 and make 3 dc in the ch-3 space. *Make a sl st in the next ch-3 space, ch 3 and make 3 dc in the same ch-3 space.* Repeat * * three more times.
Rows 8 – 13: Repeat Rows 6 and 7.
Row 14: turn your work and ch 1. Skip the first dc of the previous row and make a sl st in the next 2 dc and the ch-3 space. Ch 3 and make 3 dc in the ch-3 space. *Make a sl st in the next ch-3 space, ch 3 and make 3 dc in the same ch-3 space.* Repeat * * two more times. Make a sl st in the last ch-3 space.
Row 15: turn your work andch 1. Skip the sl st of the previous row and make a sl st in the next 3 dc and the ch-3 space from the previous row. Ch 3 and make 3 dc in the ch-3 space. *Make a sl st in the next ch-3 space, ch 3 and make 3 dc in the same ch-3 space.* Repeat * * one more time. Make a sl st in the last ch-3 space.
Row 16: turn your work and ch 1. Skip the sl st of the previous row and make a sl st in the next 3 dc and the ch-3 space from the previous row. Ch 3 and make 3 dc in the ch-3 space. Make a sl st in the next ch-3 space, ch 3 and make 3 dc in the same ch-3 space. Make a sl st in the last ch-3 space.
Rows 17: turn your work and ch 1. Skip the sl st of the previous row and make a sl st in the next 3 dc and the ch-3 space from the previous row. Ch 3 and make 3 dc in the ch-3 space. Make a sl st in the last ch-3 space.
Two examples of the lemon peel pencil case. On the left is size small and on the right is size large.
There’s a new pattern available at my etsy store. The pattern is for making a crochet pencil case using the lemon peel stitch. It’s designed with tapered, triangular sides that help it stand upright and a top that opens and closes with a zipper.
Included are instructions for making a pencil case in small and large sizes. The bag dimensions are 7.5 in. long x 2.5 in. wide x 2 in. high for the small or 9 in. long x 3 in. wide x 3 in. high for the large. Making a pencil case consists of working in rows to make the base, then working in the round with the lemon peel stitch to make the body. The lemon peel stitch is made by alternating single crochet and double crochet stitches, which gives it a bumpy, raised texture. The pencil case is finished by sewing a zipper at the top. I recommend using a cotton/cotton blend or other type of stiffer, less stretchy yarn to give the pencil case more structure.
You can purchase the pattern at etsyhere and favorite it at ravelry here.
Skill Level: Intermediate
Written with US standard crochet terms and abbreviations. Requires familiarity with basic crochet stitches (the single crochet stitch, double crochet stitch, and sc decreases), working in the round, picking up stitches along the edge of a piece and basic sewing skills for sewing in the zipper.
Gauge: 18 sc x 22 rows = 4 inches
Materials: 60 (small size), 120 (large size) yards of Worsted weight yarn Size F crochet hook Stitch marker 8 inch (small size) or 9 inch (large size) zipper Needles for yarn and thread Sewing pins
Photo of a finished sweater bag with the collar option
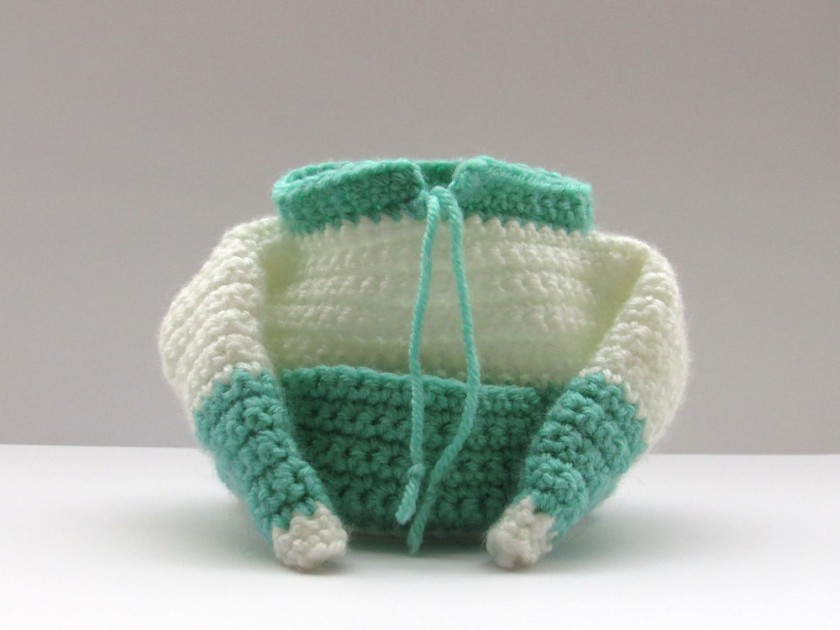
I recently added a new pattern to my etsy shop. This pattern is for making a small drawstring bag that looks like a sweater with a front pocket and either a simple collar or a hood. It involves making body, sleeve, pocket, and base pieces, then sewing them together and adding a collar or hood.
The pattern creates a bag that is approximately 4 inches tall (about 6 inches with a hood) and 12 inches around, though it is flexible and, depending on the type of yarn used, can stretch one or two inches more. The front pocket is less stretchy and can be used to hold smaller items like an eraser or measuring tape. The sleeves can be attached to the bag or sewn together to serve as handles for carrying. I’ve made several and have been using them to hold all the yarn and such I need for different projects on my desk.
Skill Level: Beginner Written with US standard crochet terms and abbreviations. Requires familiarity with basic crochet stitches (the single crochet stitch, sc increases, and sc decreases) and sewing crochet pieces together.
Gauge: 14 sc x 16 rows = 3 inches
Materials: 157 yards of Sport weight yarn, a G/4mm crochet hook and a yarn needle
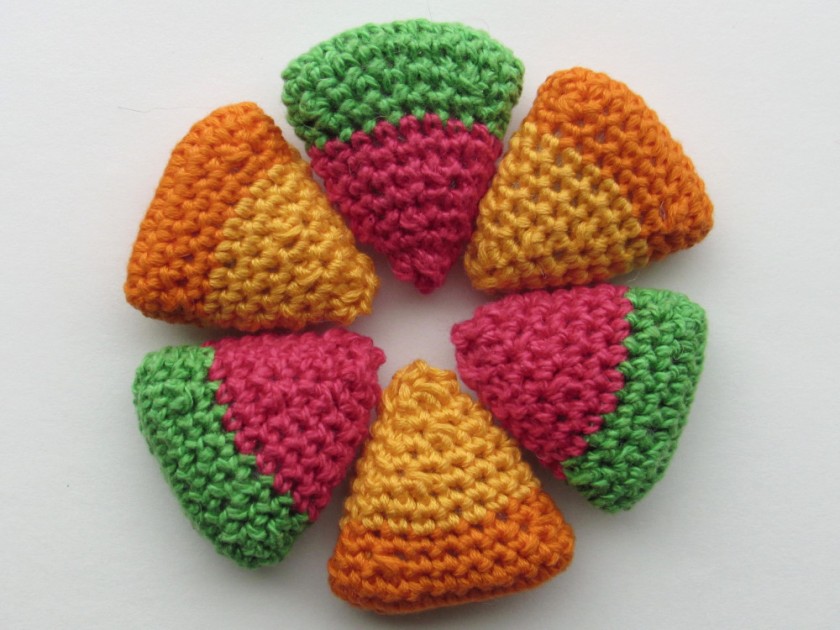
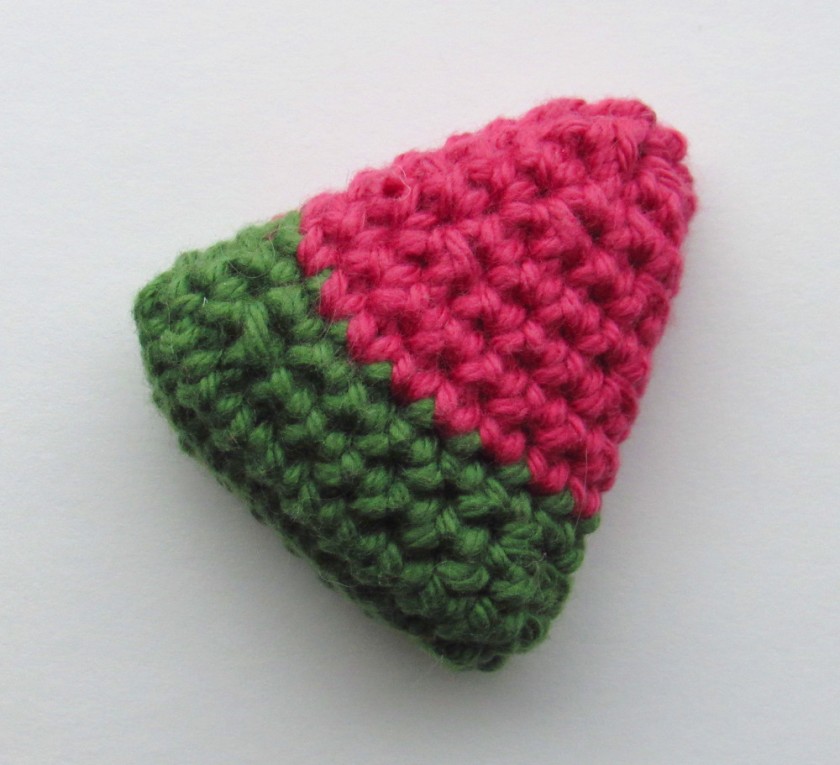
One of the first patterns I created was for a crochet candy corn. Recently, while sorting through and figuring out ways to use my yarn stash, I realized that I could use this pattern to make watermelon and orange slices. While below is just the pattern for a basic slice, you can use embroidery thread or yarn to make embellishments like seeds or a face.
If you want a download of the pattern, you can use my candy corn pattern and simply ignore the part of the pattern where you switch to Color C.
Materials: Two yarns of the same weight (Color A and Color B) Color A: green for the watermelon, or a dark orange for the orange slice Color B: red or pink for the watermelon, or a lighter orange for the orange slice Crochet hook Stuffing/Filling Yarn needle Scissors Stitch marker
Stitch abbreviations (in U.S. terms): ch: chain stitch sc: single crochet scdec: single chain decrease join: join the first and last sc of the round with a slip stitch * *: repeat instructions in between asterisks as often as indicated ( ): total number of stitches after each round
Joining your rounds
At the end of each round, the instructions read “Join.” This indicates that at the end of each round you’re going to use a slip stitch to join the last sc with the first sc. These slip stitches are not going to be worked in so you can use whatever method you’re comfortable with. The most common joining method is making a slip stitch in the first stitch of the row, then making a chain stitch before starting the next round. For my pieces, I made a slip stitch in the back loop of the first sc and skipped making a chain stitch before the next round.
PATTERN:
USING COLOR A (GREEN OR DARK ORANGE): Row 1: ch 12 Round 1: Starting in the back loop of the second chain from your hook, make 1 sc in the back loops of 11 chs (a total of 11 sc so far), then make a sc in the unworked front loops of the 11 chs (a total of 22 sc worked). Join. Round 2: sc 22 (22 sc total). Join. Round 3: *sc 1, scdec, sc 5, scdec, sc 1* Repeat everything between * * one more time (18 sc). Join. Round 4: sc 18 (18 sc). Join and switch to Color B. Start stuffing your watermelon slice and keep adding as you work. Using more stuffing will make a larger, rounder piece; less stuffing will make a flatter, smaller one. USING COLOR B (PINK/RED OR LIGHT ORANGE) Rounds 5 – 6: sc 18 (18 sc). Join. Round 7: *sc 1, scdec, sc 3, scdec, sc 1* Repeat everything between * * one more time (14 sc). Join. Round 8: sc 14 (14 sc). Join. Round 9: *sc 1, scdec, sc 1, scdec, sc 1* Repeat everything between * * one more time (10 sc). Join. Round 10: sc 10 (10 sc). Join. Round 11: scdec 5 times (5 sc). Finishing up: Fasten off, leaving a long tail and, using a yarn needle, weave under the top loops of the stitches and pull to close. Secure and weave in your end.
A C2C Popcorn stitch square made with KnitPick’s Shine Worsted yarn, in color Sweet Potato
This C2C pattern combines two different stitches: the popcorn stitch and the C2C set of ch-3, 3 dc. The popcorn stitch is made with a set of five double crochet stitches that are joined at the top with a slip stitch. This non-reversible stitch has a puffy, raised appearance. Because the popcorn stitch is visible from only one side of a crochet piece, the pattern alternates between rows of the popcorn stitch and rows of sets of ch-3, 3 dc. The border of double crochet stitches creates a contrast with the popcorn stitches, along with an easy way to join the square with other squares to create a variety of projects. This square created by this pattern is 5 inches.
The written instructions for this pattern are below. If you want a pdf version of this pattern that contains photo guides, along with instructions for modifying the size, you can find it hereat my etsy shop. You can favorite it on ravelry here.
Gauge: Working Rows 1 -3 from the pattern should create sides that are 2 inches long. (One side may be slightly less than 2 inches, but that is fine as long as the other side is 2 inches.)
Materials: 34 yards of Worsted weight yarn Size G crochet hook Yarn needle for weaving in ends
Stitch abbreviations (in US terms): C2C: Corner to Corner Crochet ch: chain stitch dc: double crochet popcorn: popcorn stitch sl st: slip stitch st/sts: stitch/stitches * *: repeat instructions in between asterisks as often as indicated
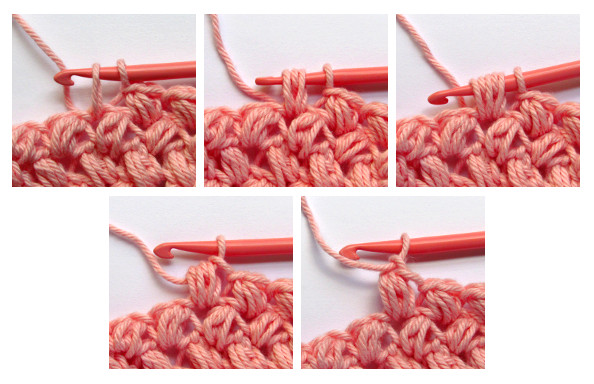
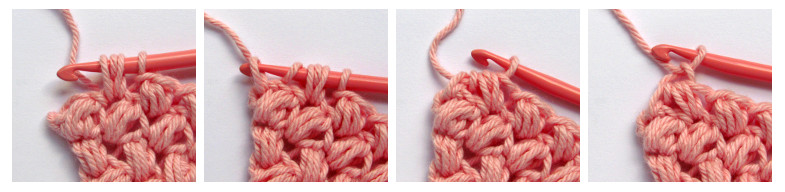
HOW TO MAKE THE POPCORN STITCH
Make 5 double crochet in a single stitch/space.
Remove your hook from the loop and insert it in the top of the first double crochet stitch.
Insert your hook into the loop from the fifth double crochet stitch.
Pull the loop through the first double crochet stitch.
Chain 1 to secure your popcorn stitch.
C2C POPCORN STITCH SQUARE WITH 3 DC BORDER PATTERN
Row 1: ch 6 and make a dc in the 4th, 5th, and 6th chs from the hook.
Row 2: turn your work and ch 6. Make a dc in the 4th, 5th, and 6th chs from the hook. Make a sl st in the ch-3 space from the previous row, ch 3 and make 3 dc.
Row 3: turn your work and ch 6. Make a dc in the 4th, 5th, and 6th chs from the hook. Make a sl st in the ch-3 space from the previous row, ch 3 and make a popcorn. Sl st in the next ch-3 space, ch 3 and make 3 dc.
Row 4: turn your work and ch 6. Make a dc in the 4th, 5th, and 6th chs from the hook. Make a sl st in the first ch-3 space from the previous row, ch 3 and make 3 dc. *Make a sl st in the next ch-3 space, ch 3 and make 3 dc.* Repeat * * two more times.
Row 5: turn your work and ch 6. Make a dc in the 4th, 5th, and 6th chs from the hook. Make a sl st in the first ch-3 space, ch 3 and make a popcorn. *Make a sl st in the next ch-3 space, ch 3 and make a popcorn.* Repeat * * one more time. Sl st in the last ch-3 space, ch 3 and make 3 dc.
Row 6: turn your work and ch 6. Make a dc in the 4th, 5th, and 6th chs from the hook. Make a sl st in the first ch-3 space, ch 3 and make 3 dc. *Make a sl st in the next ch-3 space, ch 3 and make 3 dc.* Repeat * * three more times.
Row 7: turn your work and ch 6. Make a dc in the 4th, 5th, and 6th chs from the hook. Make a sl st in the first ch-3 space, ch 3 and make a popcorn. *Make a sl st in the next ch-3 space, ch 3 and make a popcorn.* Repeat * * three more times. Sl st in the last ch-3 space, ch 3 and make 3 dc.
Row 8: turn your work and ch 6. Make a dc in the 4th, 5th, and 6th chs from the hook. Make a sl st in the first ch-3 space, ch 3 and make 3 dc. *Make a sl st in the next ch-3 space, ch 3 and make 3 dc.* Repeat * * five more times.
Row 9: turn your work, ch 1 and make a sl st in each dc to the first ch-3 space. Sl st in the ch-3 space, ch 3 and make 3 dc. *Make a sl st in the next ch-3 space, ch 3 and make a popcorn.* Repeat * * four more times. Make a sl st in the next ch-3 space, ch 3 and make 3 dc. Make a sl st in the last ch-3 space.
Row 10: turn your work, ch 1 and make a sl st in each dc to the first ch-3 space. Sl st in the ch-3 space, ch 3 and make 3 dc. *Make a sl st in the next ch-3 space, ch 3 and make 3 dc.* Repeat * * four more times. Make a sl st in the last ch-3 space.
Row 11: turn your work, ch 1 and make a sl st in each dc to the first ch-3 space. Sl st in the ch-3 space, ch 3 and make 3 dc. *Make a sl st in the next ch-3 space, ch 3 and make a popcorn.* Repeat * * two more times. Make a sl st in the next ch-3 space, ch 3 and make 3 dc. Make a sl st in the last ch-3 space.
Row 12: turn your work, ch 1 and make a sl st in each dc to the first ch-3 space. Sl st in the ch-3 space, ch 3 and make 3 dc. *Make a sl st in the next ch-3 space, ch 3 and make 3 dc.* Repeat * * two more times. Make a sl st in the last ch-3 space.
Row 13: turn your work, ch 1 and make a sl st in each dc to the first ch-3 space. Sl st in the ch-3 space, ch 3 and make 3 dc. Make a sl st in the next ch-3 space, ch 3 and make a popcorn. Make a sl st in the next ch-3 space, ch 3 and make 3 dc. Make a sl st in the last ch-3 space.
Row 14: turn your work, ch 1 and make a sl st in each dc to the first ch-3 space. Sl st in the ch-3 space, ch 3 and make 3 dc. Make a sl st in the next ch-3 space, ch 3 and make 3 dc. Make a sl st in the last ch-3 space.
Row 15: turn your work, ch 1 and make a sl st in each dc to the first ch-3 space. Sl st in the ch-3 space, ch 3 and make 3 dc. Make a sl st in the last ch-3 space.
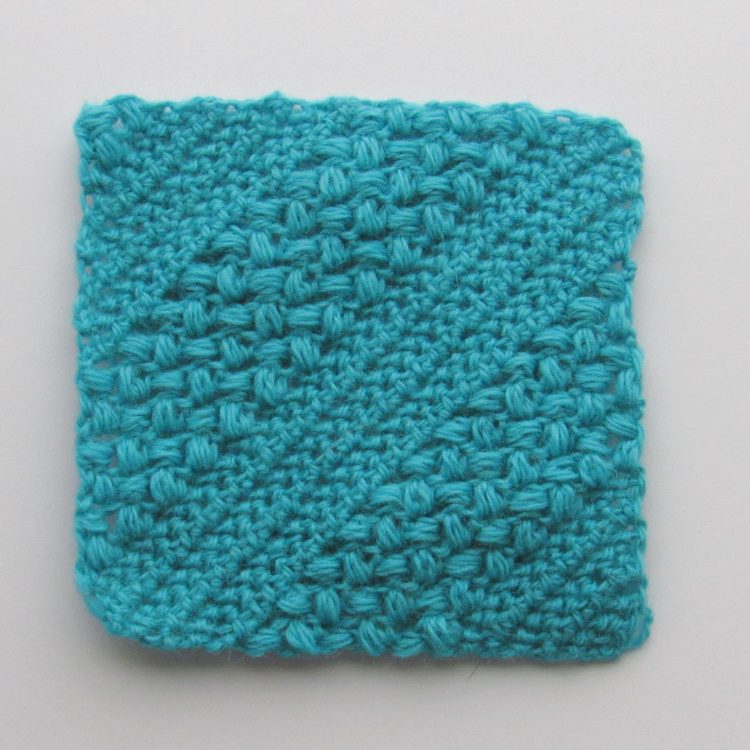
The bean stitch can be a little intimidating for a beginner (so many loops!) but after some practice, it’s an easy way to provide a lot of texture and dimension to a crochet piece. Normal, non-C2C bean stitches already have a very strong slant that switches from left to right with each new row. C2C bean stitches also have that switching slant though it produces a different effect; the beans of one row look horizontal, while the beans of the next row look vertical.
This C2C variation involves increasing or decreasing by one stitch per row. The number of bean stitches in a row is going to be one higher or one lower than the previous row. (For example, after completing a row with 5 beans, the next row will have 6 beans if you’re still continuing the square or 4 beans if you’re closing the square.) Increases are made at the beginning of the row while decreases (Bean Across 2 Stitches/BA2) are made in the last two stitches of a row.
Below are text instructions for making a C2C bean stitch crochet square. A pdf download of this pattern that contains step-by-step photo guides along with instructions for making a C2C bean stitch rectangle can be found at my etsy shop here. You can also favorite/queue it on ravelry here.
Materials: Any kind of yarn A crochet hook in a size appropriate for the yarn used Yarn needle for weaving in ends Stitch markers are recommended for marking the ch-2 spaces created at the beginning of rows.
Stitch abbreviations (in US terms): C2C: Corner to Corner Crochet ch: chain stitch bean: bean stitch BA2: bean across two stitches
PATTERN NOTES:
MAKING THE BEAN STITCH
Insert your hook in the stitch below, yarn over and pull through the stitch. (2 loops on your hook)
Yarn over and insert your hook into the same stitch, yarn over and pull through the stitch. (4 loops on your hook)
Yarn over and insert your hook into the same stitch, yarn over and pull through the stitch. (6 loops on your hook)
Yarn over and pull through all 6 loops.
Ch 1 to close the bean.
Remember, when making a bean, insert your hook into the side of the bean below, not the ch 1 closing stitch.
HOW TO MAKE A BEAN ACROSS 2 STITCHES (BA2):
For Row 1 and the decreasing rows, you’re going to need to make a bean stitch across 2 stitches (BA2). To do this,follow these steps:
Work a bean stitch in one stitch until you have 4 loops on your hook. (Insert your hook in the first stitch, yarn over and pull through the stitch, yarn over, insert your hook in the same stitch, yarn over and pull through the stitch.)
Move to the next stitch and create 2 more loops for a total of 6 loops on your hook across 2 stitches. (Yarn over, insert your hook into the next stitch, yarn over and pull through the stitch.)
Yarn over and pull through all 6 loops.
Ch 1 to close the BA2.
THE CH 1 CLOSING STITCH
Each bean consists of the “bean” (the loops drawn up and pulled through) and a ch 1 closing stitch. DO NOT FORGET THE CH 1 CLOSING STITCH. You end a row with a bean and a ch 1. When you start a new row, this ch 1 will not be included in the instructions for how many chains to make at the start of the row. So if a row starts off with “ch 2” that means you will have a total of 3 chains made: the closing chain from the last row and two new chains to start the new row.
WHERE TO MAKE YOUR BEAN AT THE END OF A ROW
At the beginning of a row, you’re going to create a chain space and a bean. I highly recommend using a stitch marker to mark the space between the chain space and the bean to make it easier to work in this space later.
For rows that start with “ch 2”, place a stitch marker around the ch 2 space and continue with the pattern.
For rows that don’t start with “ch 2”, place the stitch marker around the closing ch 1 of the last bean from the previous row and continue with the new row.
After marking this space and completing the row, you’ll move on to the next row. When you get to the end of the row, instead of working in the side of the last bean, you’ll work in the space between the bean and the chain space.
PATTERN
STARTING THE C2C BEAN STITCH
Row 1: ch 4 and make a bean across the 3rd and 4th chs from the hook (BA2).
Row 2: turn your work and ch 2. Make a bean in the 3rd ch from the hook and a bean in the space between the bean and ch-2 space from the previous row.
Row 3: turn your work and ch 2. Make a bean in the 3rd ch from the hook. Then make a bean in the side of every bean from the previous row until the last bean stitch. At the last bean of the row, make a bean in the space between the bean and the ch-2 space.
Row 4+: Keep repeating Row 3 until you reach your desired size.
CLOSING THE C2C BEAN STITCH SQUARE
Row 1: turn your work and make a bean in the first and every bean until the last two stitches. Make a BA2 in the last two beans. While making the BA2, work the first 4 loops in the side of the first bean and the last 2 loops in the space made in between the bean and ch-2 space of the previous row.
Row 2: turn your work and make a bean in the first and every bean until the last two stitches. Make a BA2 in the last two beans. While making the BA2, work the first 4 loops in the side of the first bean and the last 2 loops in the the space made from the second bean and the closing ch from the row before it.
Row 3: Keep repeating Row 2 until you get to the end. Your last row will consist of only one BA2.
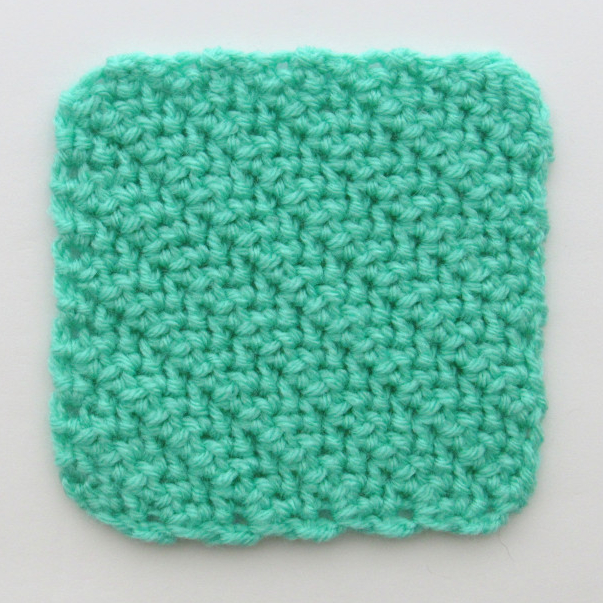
A green C2C herringbone hdc square made with Knit Pick’s acrylic Brava yarn
This is possibly my favorite C2C variation I’ve worked on so far. Like the lemon peel stitch, this stitch has a really wonderful texture that seems to work well with any type of yarn. The herringbone hdc stitch is a simple variation on the normal hdc stitch that really changes the look and texture of the hdc stitch. The herringbone hdc stitches are slanted stitches that, unlike the hdc stitch, don’t have the appearance of a straight line created by a front loop. Instead, a line of little bumps is made.
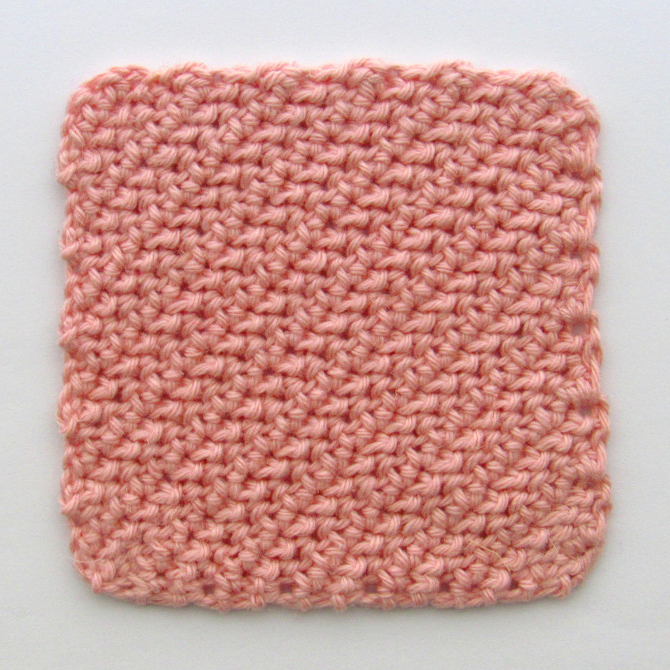
A pink C2C herringbone hdc square made from Knit Pick’s Dishie cotton yarn
Unlike the normal herringbone hdc stitch, where the lines would run horizontally from one side to the other, the lines in the C2C herringbone hhdc stitch piece run diagonally, starting from one corner at the bottom and running to the top corner on the opposite side of the piece. The basics of this method are making a ch-2 space at the beginning of each row that will be worked in at the end of the next row. This means you’ll be making an increase of two stitches per row. When it comes to decreasing, with the exception of the first decrease row, a total of two decreases will be made per row. One decrease will be made at the beginning of a row while the second will be made at the end. You should always have an even number of stitches for each row.
As a little aside for those wondering about substituting the herringbone hdc with the herringbone dc stitch: my first attempts at a C2C herringbone variation were with the herringbone dc stitch and I could not find a way to create a square that had a similar stretchiness along the starting and closing sides. The sides created at the beginning were so much more elastic than the closing sides. So, if you’re thinking about using this method to make a triangle, then substituting the herringbone hdc with a herringbone dc would be fine. However, I don’t recommend this change for creating a square.
Below are text instructions for making a C2C herringbone hdc stitch crochet square. A pdf download of this pattern that contains step-by-step photo guides along with instructions for making a C2C herringbone hdc rectangle can be found at my etsy shop here. You can also favorite/queue it on ravelry here.
Materials needed: Any kind of yarn A crochet hook in a size appropriate for the yarn used Yarn needle for weaving in ends
Stitch abbreviations (in US terms): C2C: Corner to Corner Crochet ch: chain stitch hhdc: herringbone hdc stitch sl st: slip stitch st/sts: stitch/stitches
Notes:
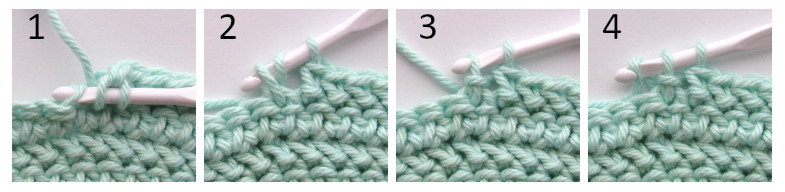
A. HOW TO MAKE A HERRINGBONE HDC STITCH
Yarn over, insert your hook into the stitch. (Two loops on the hook.)
Yarn over and pull through the stitch. (Three loops on the hook.)
Do not yarn over. Pull the left loop through the middle loop. (Two loops on the hook.)
Yarn over and pull through the remaining 2 loops.
B. ch-2 spaces: a ch-2 space will be created at the beginning of each row. This space will not be worked in until the end of the following row. That space might be hard to get to if you’re not used to it. So after chaining 2 at the start of the row, take a stitch marker and place it around the chain that’s closest to the hook before you make the next stitch. This can help you find that space when it needs to be worked in the next row.
C. ch-1 spaces and slip stitches: In the “CLOSING YOUR SQUARE” section, you will see instructions to “turn your work and ch 1” and to “make a sl st, ch 1, and make a hhdc” . These ch 1 spaces and slip stitches will not be worked in later in the pattern.
STARTING THE C2C HERRINGBONE HDC STITCH
Row 1: ch 3 and make 2 hhdc in the third chain from the hook.
Row 2: turn your work and ch 2. Make a hhdc in the 3rd st from the hook (the last hhdc of the previous row) and in the next st. Make 2 hhdc in the ch-2 space.
Row 3: turn your work and ch 2. Starting from the 3rd st from the hook (the last hhdc of the previous row), make a hhdc in each st to the ch-2 space. Make 2 hhdc in the ch-2 space.
Row 4+: Repeat Row 3, starting each row with a ch 2 and making a hhdc in each stitch until you get to the ch-2 space at the end, where you work 2 hhdc.
CLOSING YOUR SQUARE
Row 1: turn your work and ch 1. Starting from the first hhdc of the previous row, make a hhdc in each st to the ch-2 space. Make a sl st in the ch-2 space.
Row 2: turn your work and ch 1. Skip 1 st (the previous sl st) and make a sl st in the next st. Ch 1 and make a hhdc in the next and every hhdc until the last hhdc. Make a sl st in the last hhdc.
Row 3+: Keep repeating Row 2 until you have 4 hhdc sts left. Then move to the Final Row.
Final Row: turn your work and ch 1. Skip 1 st (the previous sl st) and make a sl st in the next. Ch 1 and make a hhdc in the next 2 sts. Make a sl st in the last st.
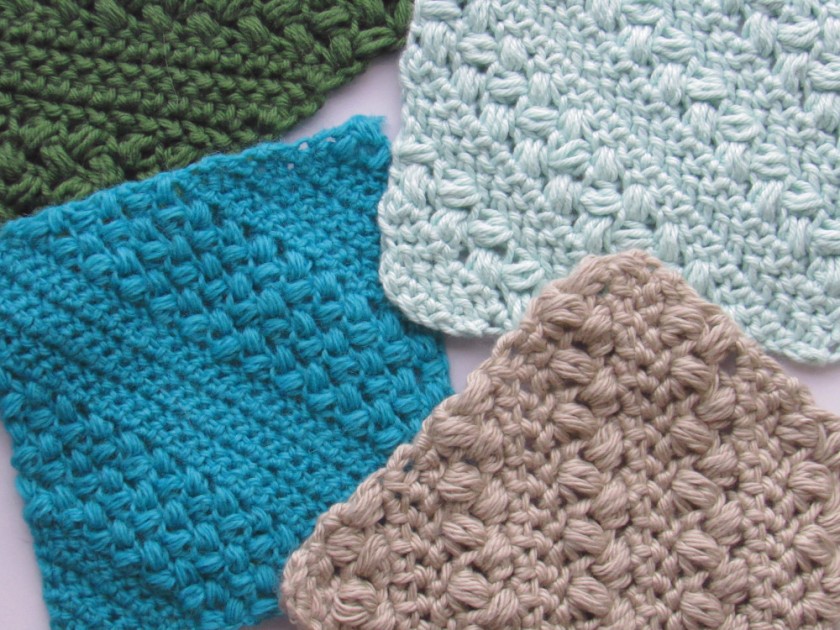
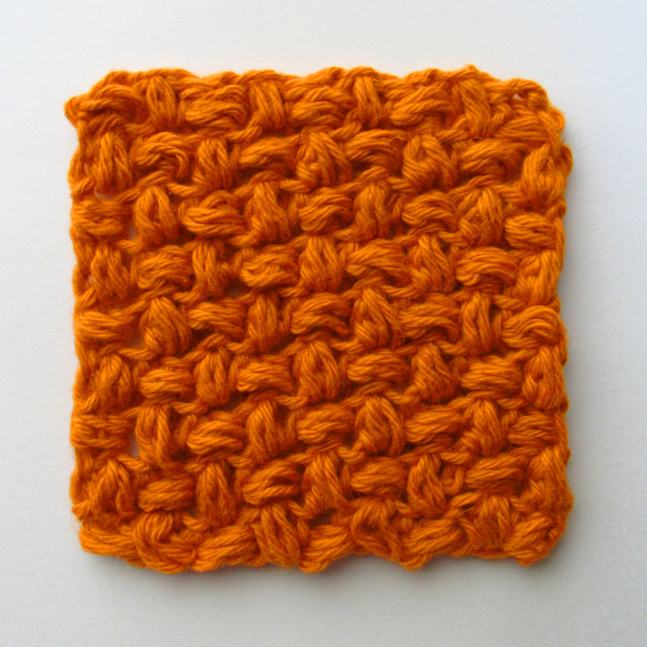
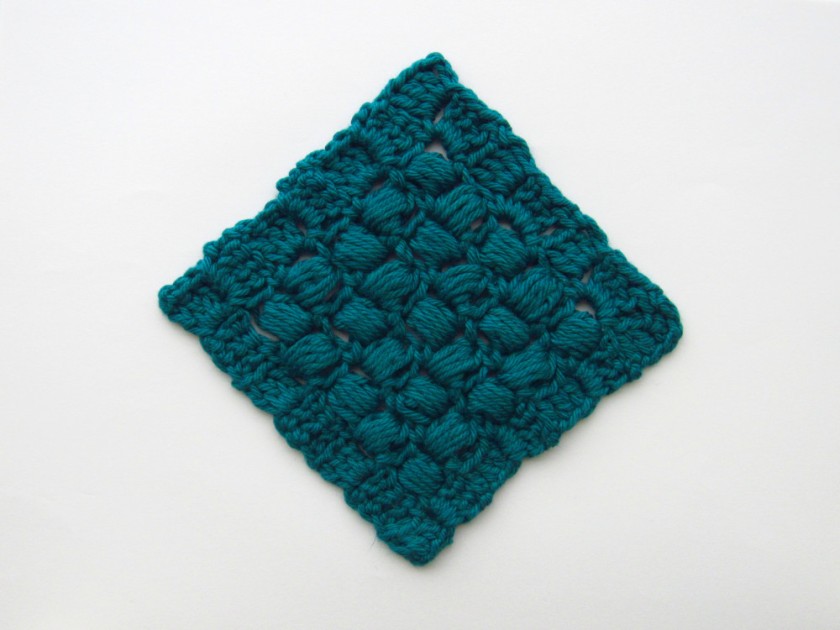
A C2C puff stitch square with a 3 dc border, made from Knit Pick’s Dishie yarn, color Kenai
This C2C pattern combines two different stitches: the Puff stitch and the C2C set of ch-3, 3 dc. The puff stitch is a thick crochet stitch that provides a puffy, raised texture to any crochet project. Working them in the C2C crochet method causes the direction of the puffs change with each row. The 3 dc border creates a contrast with the puff stitches, along with an easy way to join the square with other squares to create a variety of projects. This square created by this pattern is 4.5 inches.
The written instructions for this pattern are below. If you want a pdf version of this pattern that contains photo guides, along with instructions for modifying the size and type of puff used, you can find it hereat my etsy shop. You can favorite it on ravelry here.
Gauge: Working Rows 1 -3 from the pattern should create sides that are 2 inches long. (One side may be slightly less than 2 inches, but that is fine as long as the other side is 2 inches.)
Materials: 24 yards of Worsted weight yarn Size G crochet hook Yarn needle for weaving in ends
Stitch abbreviations (in US terms): C2C: Corner to Corner Crochet ch: chain stitch dc: double crochet puff: puff stitch sl st: slip stitch st/sts: stitch/stitches * *: repeat instructions in between asterisks as often as indicated
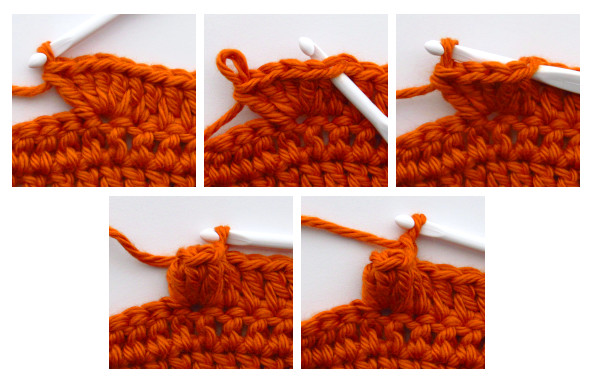
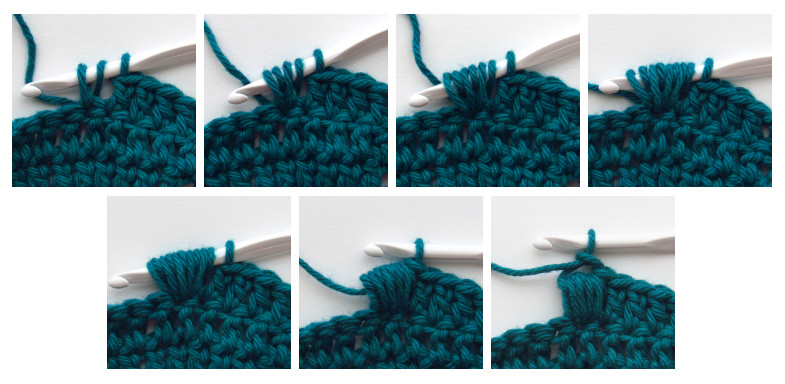
THE PUFF STITCH
The puff stitch is made by drawing up multiple loops in a single stitch before closing the stitch. A chain stitch secures the stitch. Puffs can be made by drawing up different numbers of loops before closing. This pattern uses an 11-loop puff stitch.
To make a an 11-loop puff stitch:
Yarn over, insert your hook into the stitch, yarn over and pull through the stitch (3 loops on the hook).
Yarn over, insert your hook into the same stitch, yarn over and pull through the stitch (5 loops on the hook).
Yarn over, insert your hook into the same stitch, yarn over and pull through the stitch (7 loops on the hook).
Yarn over, insert your hook into the same stitch, yarn over and pull through the stitch (9 loops on the hook).
Yarn over, insert your hook into the same stitch, yarn over and pull through the stitch (11 loops on the hook).
Yarn over and pull through all loops on the hook.
Ch 1 to secure your puff.
C2C PUFF STITCH SQUARE WITH 3 DC BORDER PATTERN
Row 1: ch 6 and make a dc across the 4th, 5th, and 6th chs from the hook.
Row 2: turn your work and ch 6. Make a dc across the 4th, 5th, and 6th chs from the hook. Make a sl st in the ch-3 space from the previous row, ch 3 and make 3 dc.
Row 3: turn your work and ch 6. Make a dc across the 4th, 5th, and 6th chs from the hook. Make a sl st in the ch-3 space from the previous row, ch 3 and make a puff. Sl st in the next ch-3 space, ch 3 and make 3 dc.
Row 4: turn your work and ch 6. Make a dc across the 4th, 5th, and 6th chs from the hook. *Make a sl st in the ch-3 space from the previous row, ch 3 and make a puff.* Repeat * * one more time. Sl st in the last ch-3 space, ch 3 and make 3 dc.
Row 5: turn your work and ch 6. Make a dc across the 4th, 5th, and 6th chs from the hook. *Make a sl st in the ch-3 space from the previous row, ch 3 and make a puff.* Repeat * * two more times. Sl st in the last ch-3 space, ch 3 and make 3 dc.
Row 6: turn your work and ch 6. Make a dc across the 4th, 5th, and 6th chs from the hook. *Make a sl st in the ch-3 space from the previous row, ch 3 and make a puff.* Repeat * * three more times. Sl st in the last ch-3 space, ch 3 and make 3 dc.
Row 7: turn your work and ch 6. Make a dc across the 4th, 5th, and 6th chs from the hook. *Make a sl st in the ch-3 space from the previous row, ch 3 and make a puff.* Repeat * * four more times. Sl st in the last ch-3 space, ch 3 and make 3 dc.
Row 8: turn your work, ch 1 and make a sl st in each st to the first ch-3 space. Sl st in the ch-3 space, ch 3 and make 3 dc. *Make a sl st in the next ch-3 space, ch 3 and make a puff.* Repeat * * three more times. Make a sl st in the next ch-3 space, ch 3 and make 3 dc. Make a sl st in the last ch-3 space.
Row 9: turn your work, ch 1 and make a sl st in each st to the first ch-3 space. Sl st in the ch-3 space, ch 3 and make 3 dc. *Make a sl st in the next ch-3 space, ch 3 and make a puff.* Repeat * * two more times. Make a sl st in the next ch-3 space, ch 3 and make 3 dc. Make a sl st in the last ch-3 space.
Row 10: turn your work, ch 1 and make a sl st in each st to the first ch-3 space. Sl st in the ch-3 space, ch 3 and make 3 dc. Make a sl st in the next ch-3 space, ch 3 and make a puff. Repeat * * one more time. Make a sl st in the next ch-3 space, ch 3 and make 3 dc. Make a sl st in the last ch-3 space.
Row 11: turn your work, ch 1 and make a sl st in each st to the first ch-3 space. Sl st in the ch-3 space, ch 3 and make 3 dc. Make a sl st in the next ch-3 space, ch 3 and make a puff. Make a sl st in the next ch-3 space, ch 3 and make 3 dc. Make a sl st in the last ch-3 space.
Row 12: turn your work, ch 1 and make a sl st in each st to the first ch-3 space. Sl st in the ch-3 space, ch 3 and make 3 dc. Make a sl st in the next ch-3 space, ch 3 and make 3 dc. Make a sl st in the last ch-3 space.
Row 13: turn your work, ch 1 and make a sl st in each st to the first ch-3 space. Sl st in the ch-3 space, ch 3 and make 3 dc. Make a sl st in the last ch-3 space.
Finish your project by cutting your yarn, leaving a long tail, and pulling through your last worked stitch. Then use a yarn needle to weave your end in. Block your piece according to the type of yarn used.